CP Management
Summary
CP Management shows your factory's critical path for shared orders. Clear overdue items on Needs Attention, check Dashboard health, update planned (when empty) and actual dates on the CP Grid, save the SpringNE people you message under Contacts (with per-order overrides), and leave notes or messages for Merchandising.
How to
Open the app
- Sign in to Spring Hub.
- Click CP Management (lands on Needs Attention by default).
- Use the left navigation (or mobile menu) to move between the areas below.
Language (EN / TR)
- In the CP Management header, use the EN / TR control to switch the app language.
- Your choice is remembered for next visits (browser cookie).
- Labels, buttons, and outreach message templates follow the selected language. Order data from CRM (PO, style, quantities, party names) and text you typed in notes or messages stay in their original language.
Needs Attention
Overdue milestones for your factory that need follow-up.
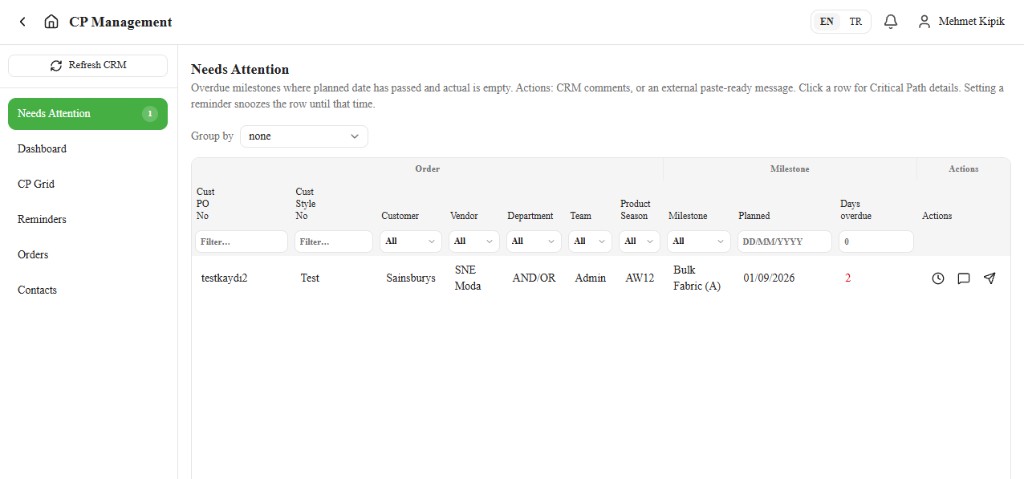
- Open Needs Attention.
- Review the list (highest Days overdue first). Columns include PO, Style, Customer, Vendor, Department, Team, Product Season, Milestone, Planned, and Days overdue.
- Filter and sort like the CP Grid: click a header to sort; use the filter row to search text columns or pick values for Customer, Vendor, Department, Team, Product Season, and Milestone. Use Group by above the table to choose the grouping. Order (the default) shows one row per order with its details, the earliest Planned date, and the highest Days overdue; click N delayed dates on the row to expand that order's delayed milestones. You can also group under Milestone, Customer, Vendor, Department, Team, or Product Season. Planned dates show as DD/MM/YYYY.
- Open comments, or use External message for paste-ready outreach to Merchandising.
- Click a row (outside the N delayed dates button) to open order and product details, all Critical Path dates, and notes / chat.
When there are no overdue items, the page shows No overdue milestones — all clear.
Dashboard
Overview of critical-path health for your orders — summary cards and performance.
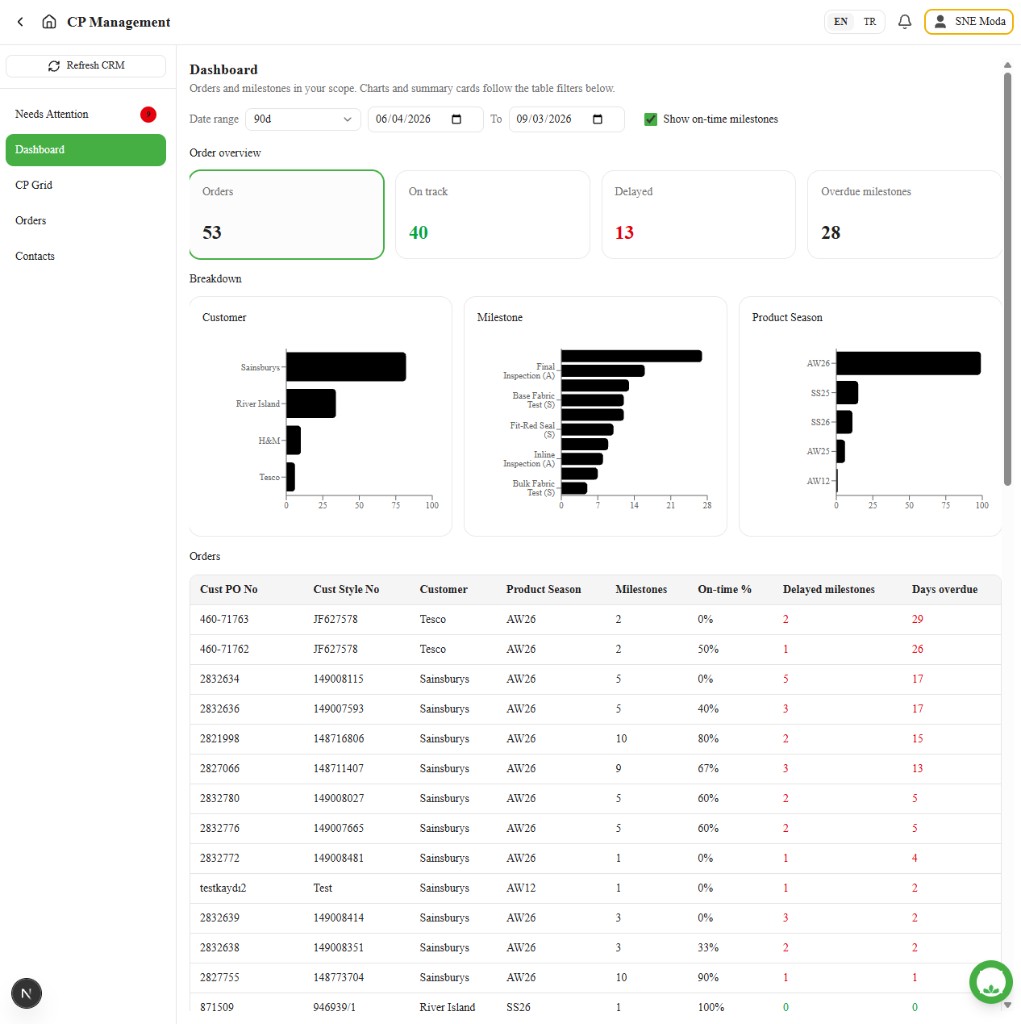
- Open Dashboard.
- Review Order overview cards (orders, on track, delayed, overdue milestones).
- Review order performance charts and the performance table.
CP Grid
Update milestone dates and open notes / messages.
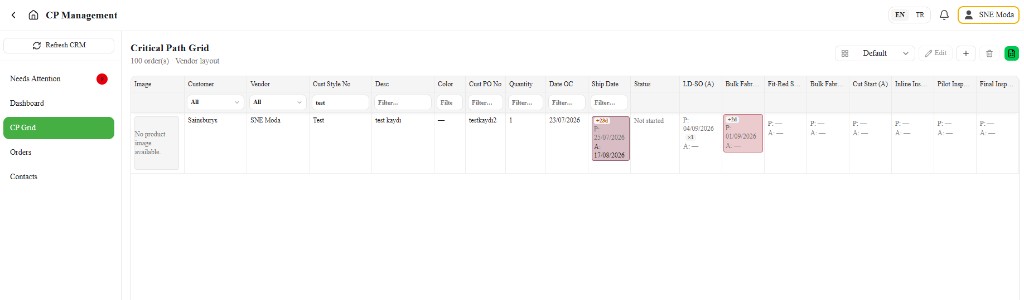
- Open CP Grid (page title Critical Path Grid).
- Find the order / milestone.
- Edit planned and actual dates using the rules below.
- Click a row to open order and product details, Critical Path dates, and the notes / chat section.
- Use View, Columns, or Refresh as needed.
Calendar dates display as DD/MM/YYYY (for example 18/08/2026).
Views (Default and All)
- Use the View dropdown in the CP Grid toolbar.
- Default — curated milestone columns for day-to-day work (eight core approvals always visible; optional milestones such as Wash hidden).
- All — every milestone column, including Sending columns and milestones hidden on Default (for example Wash).
- Default and All are built-in — nobody can edit or delete them. Use New view for a custom layout.
- If an older saved view looks wrong, switch to Default or All, or Columns → Reset.
Sort and filter
- Click a column header to sort. Click again to reverse; a third click clears the sort.
- Type in the filter row under a product / order column to narrow rows.
- Department, Transport, Supplier, and Customer open a dropdown. Tick one or more values. Select all ticks every option; Clear (or untick all) shows every row again. Empty values appear as (Blank).
Columns
Click Edit (next to the View dropdown) to show or hide columns, rename headers, reorder by dragging the grip handle, rename the view at the top, and optionally Hide Sending columns (show Approval only). Column editing is not available on built-in Default or All — create a New view first. A new view starts with every column visible, including the sending dates (Lab Dip, Red Seal, Green Seal, Gold Seal, Bulk Fabric Test Report, Wash, and Trim sending). Hide the columns you do not need with the eye icon in the column picker. Preferences stay in your browser.
Planned dates
- Enter a planned date while the cell is still empty.
- After the first planned value is saved, you may revise it once (with a reason) while no actual date exists anywhere on the order.
- Once any milestone on the order has an actual, planned dates that are already set lock. Empty planned dates can still be filled once — any date is accepted, including a past date.
Actual dates
- Enter actual dates when work completes.
- The first actual needs no revision reason.
- Changing or clearing an existing actual requires a Reason for revision and increases the ×N revision count.
Generate CP Plan
Fill empty planned dates between Date OC and Ship Date (actual) from the order drawer.
- Open the order drawer from the CP Grid.
- Click Generate CP Plan (top right).
- Review the preview table, then click Apply N date(s) for milestones marked Will set (already-set dates are skipped). The plan includes Pilot Inspection and Inline Inspection. Turkish national holidays are skipped.
Some new orders already arrive with planned dates: SpringNE plans them automatically overnight when every date is still ahead.
Unavailable when there is no Date OC or Ship Date (actual), when Date OC is not before ship, or when any milestone already has an actual on critical path. In that case, fill any empty planned dates one by one on the grid.
After you save an actual
- The editor closes at once and the milestone updates on the grid — the date is stored in the background, so you can move to the next cell straight away.
- Optionally Inform SpringNE so Merchandising sees the date update on the shared thread.
- The item leaves Needs Attention when that milestone is no longer overdue.
If a date cannot be stored (for example Merchandising changed the same cell first), the grid puts the old value back.
Colours and days
| Look | Meaning |
|---|---|
| Green fill + −Nd | Early (actual before planned) |
| Red / pink fill + +Nd | Late or overdue |
| Yellow | Planned is today, no actual yet |
| No fill | Not started or planned still in the future |
| ×N | How many times the actual was revised (not the same as +Nd) |
Order detail (row click)
Click an order row on the CP Grid (or from Orders / Needs Attention) to open the detail view. It shows:
- Product image and order / product details
- Critical Path dates along the top (planned and actual)
- Notes / chat on the right
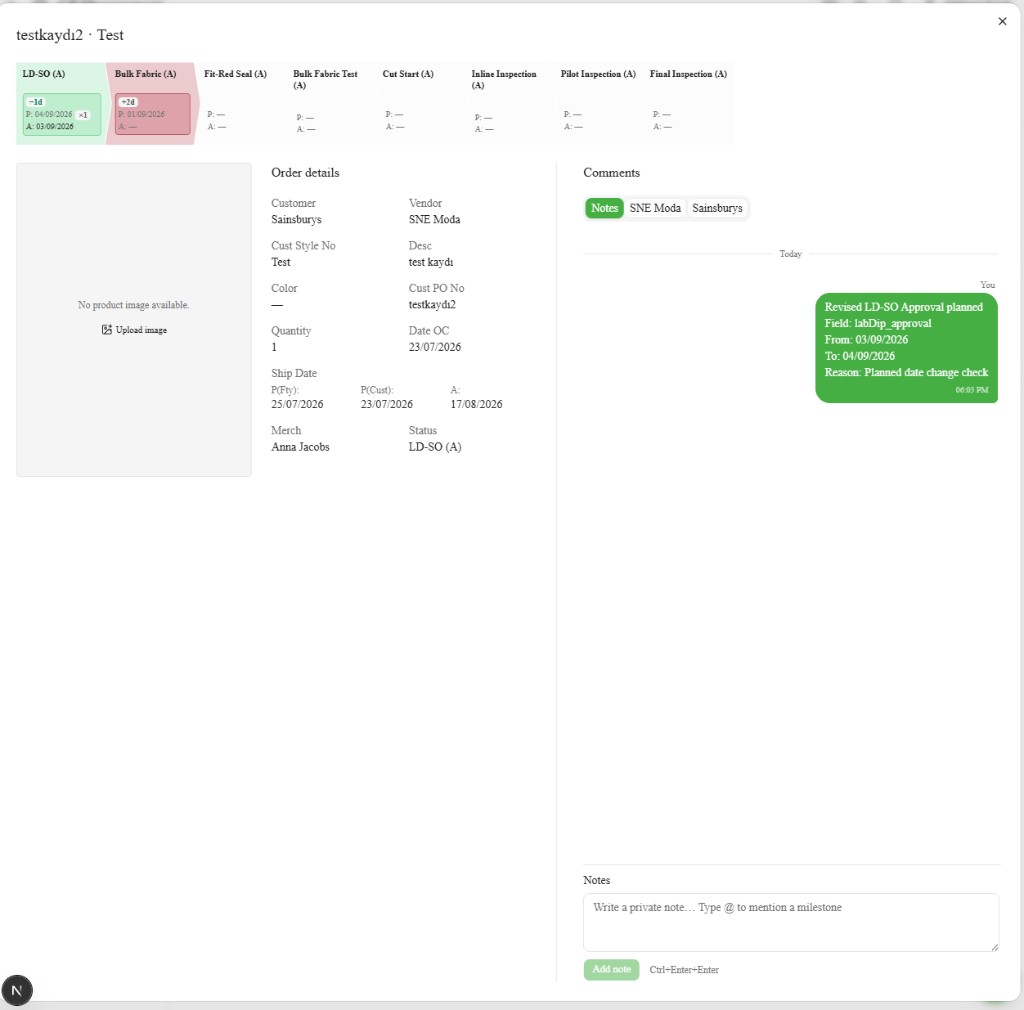
Click the product image (Click image to enlarge) to open a larger view.
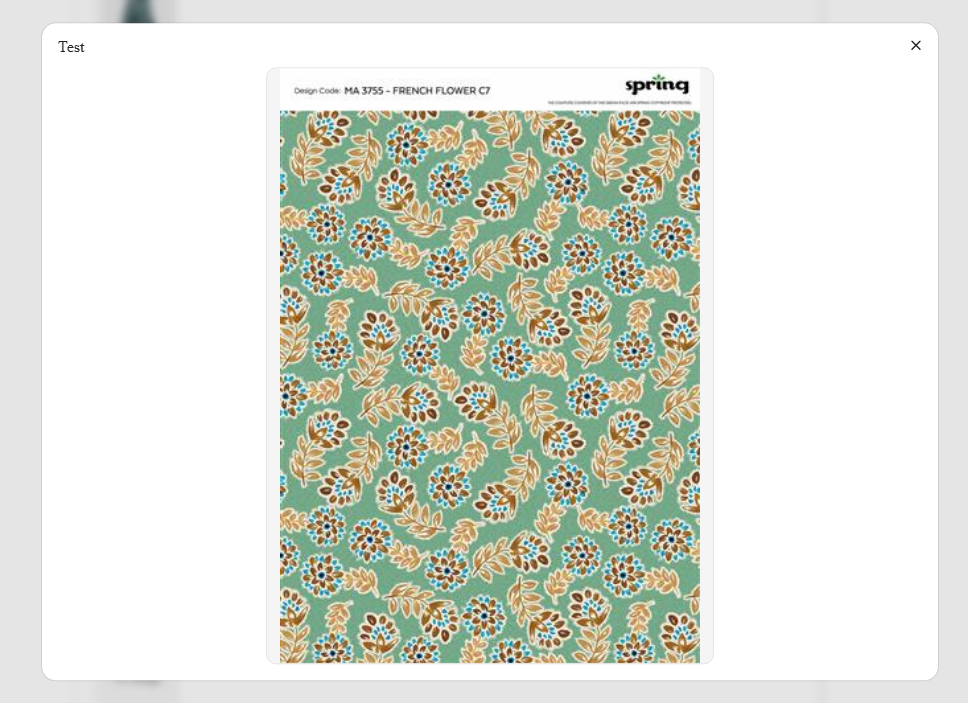
Notes and messages
- In the detail view, use Notes & messages.
- Notes — private to your factory team.
- SpringNE tab — shared message thread with SpringNE (everyone on the thread can read it).
- Under To, choose which SpringNE employees get the in-app / push notification. When you have saved Contacts, the list is filled in from there; otherwise pick at least one person before you send. You cannot send with an empty To list.
- Type @ in a note or message to mention a milestone — that text then appears above Revision history when someone opens Edit milestone dates for that column.
- Use External message from Needs Attention for paste-ready Teams / WhatsApp / Email text.
What you write appears in the thread as soon as you send it, slightly faded until it is stored, and the box clears so you can keep typing. If it cannot be posted, it is removed from the thread and the reason shows under the message.
Orders
Order-level views for your factory's work.
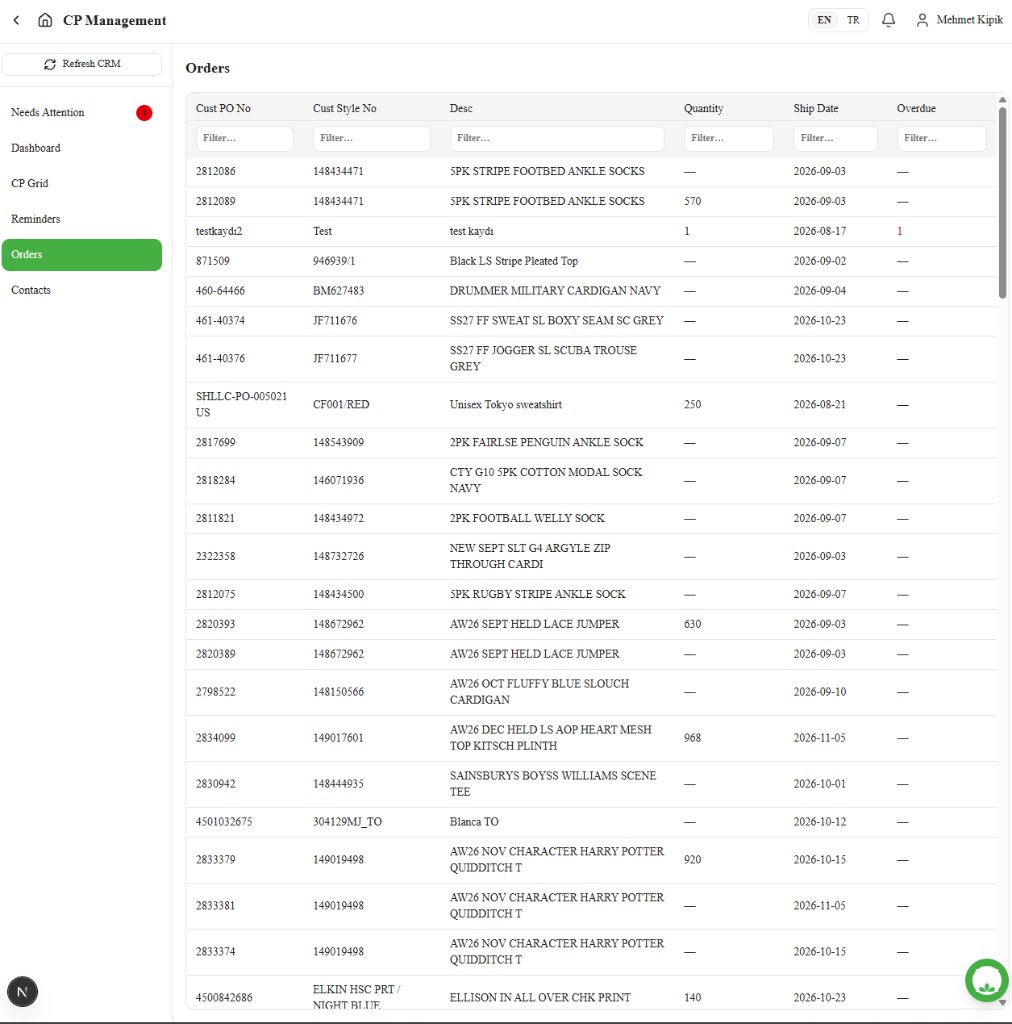
- Open Orders.
- Filter by PO, Style, Description, Qty, Ex-factory, or Overdue as needed.
- Open an order for more detail (same order detail view as above).
Contacts
Decide once which SpringNE people you message, instead of picking them every time you send. Your choices are personal — they do not change what your colleagues see.
- Open Contacts.
- SpringNE is listed as one row with the contacts you message and the number of orders under it.
- Use the search box to narrow the orders to a specific PO, style, or description.
Set your SpringNE contacts
- Click Set contacts.
- Type at least three letters to search SpringNE employees, pick the people, and click Save contacts.
All your orders now use those contacts.
Override a single order
Do this when one order needs different people from the rest.
From the order drawer:
- Open the order and go to the Messages tab.
- Change the To list.
- Click Always use for this order next to the list. Skip this step if the change is only for the message you are about to send.
From Contacts:
- Expand SpringNE to see your orders.
- Tick the orders, click Override contacts, pick the people, and click Save contacts.
Overridden orders show an Override tag; the rest show Company contacts.
Go back to your usual contacts
- In the order drawer, click Use company contacts next to the To list.
- On Contacts, expand SpringNE, tick the orders, click Use company contacts, and confirm.
Where contacts are used
- The To list on the SpringNE thread arrives filled in from Contacts. Changing it without clicking Always use for this order applies to that message only.
- Inform SpringNE on a date update notifies those same contacts. When you have none saved, it goes to the merchandiser on the order, as before.
Exceptions and Escalation
If you cannot edit a planned cell, the order may already have an actual and this planned date was already set (or filled once), you already used your one planned revision, or the cell is disabled — contact Merchandising. Escalate access issues to your SpringNE merchandiser.
Related articles
- CP Management — Order Management process
- Guests