CP Management
Summary
CP Management is the critical-path workspace for orders on your CRM team. Staff see all active orders linked to the same team as your employee record (not only styles where you are the product merchandiser). Use it to clear overdue milestones on Needs Attention, monitor health on Dashboard, edit planned and actual dates on the CP Grid (with hover revision history and required revision reasons), set personal reminders, save the people you message at each vendor and customer under Contacts, inform vendors and customers on shared threads, and open order-level detail. An AI assistant (circular button, bottom-right) is available when you need help finding or updating work.
How to
Open the app
- Sign in to Spring Hub.
- Click CP Management (lands on Needs Attention by default).
- Use the left navigation (or mobile menu) to move between the areas below.
Language (EN / TR)
- In the CP Management header, use the EN / TR control to switch the app language.
- Your choice is remembered for next visits (browser cookie).
- Labels, buttons, and outreach message templates follow the selected language. Order data from CRM (PO, style, quantities, party names) and text you typed in notes or messages stay in their original language.
Needs Attention
Active overdue milestones that need follow-up (items without a future personal reminder).
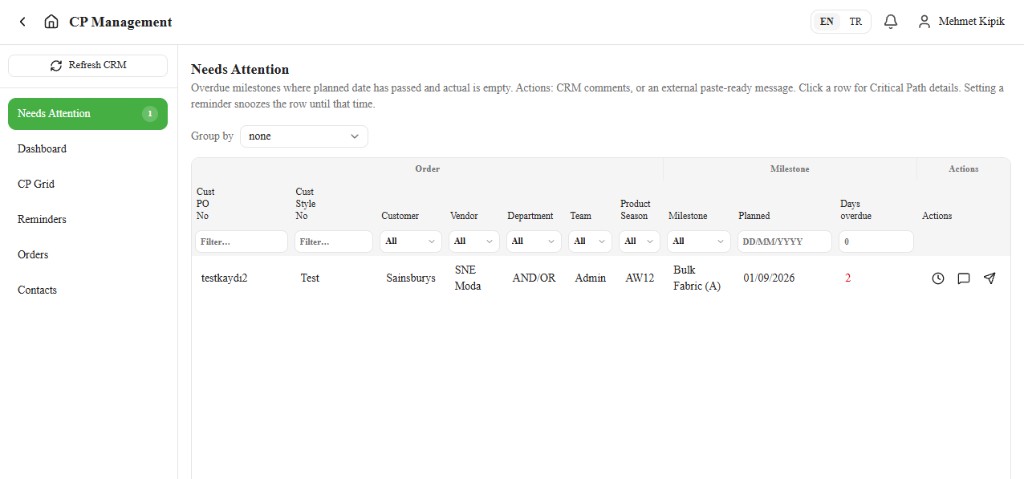
- Open Needs Attention.
- Review the list (sorted with the highest Days overdue first). Columns include PO, Style, Customer, Vendor, Department, Team, Product Season, Milestone, Planned, and Days overdue.
- Filter, sort, and search like the CP Grid:
- Click a column header to sort (ascending → descending → default).
- Use the filter row under the headers: type to search text columns, or open the dropdown to pick values for Customer, Vendor, Department, Team, Product Season, and Milestone.
- Use Group by above the table to choose how rows are grouped. Order (the default) shows one row per order — see Group by Order below. You can also group under Milestone, Customer, Vendor, Department, Team, or Product Season, or choose None for a flat list.
- Planned dates show as DD/MM/YYYY.
- For an item you can:
- Open Comments for notes and shared messages on that order
- Use External message for paste-ready outreach (Teams / WhatsApp / Email / Copy)
- Use Snooze to set a personal reminder and hide the item until that time
- Snoozed items appear under Snoozed. Expand the section to see Until, optional Note, and Unsnooze. When the reminder is due (or you Unsnooze / Mark done and the milestone is still overdue), the item returns to the active list.
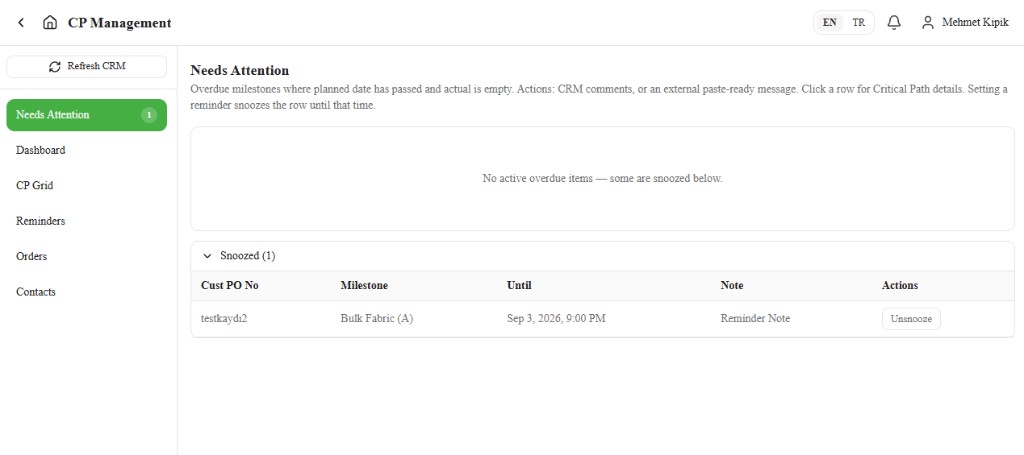
Days overdue = whole calendar days from the planned date to today, for open milestones (planned in the past, no actual yet).
Group by Order
With Group by set to Order, each order appears once:
- Read the order row. It shows the order details, the earliest Planned date, and the highest Days overdue among its delayed milestones.
- Click the N delayed dates button on the row to expand that order's delayed milestones. Each milestone has the same actions as above (Snooze, Comments, External message).
- Click the order row itself (outside the button) to open the order with all its dates.
Dashboard
CP analytics and performance from Power BI (embedded report).
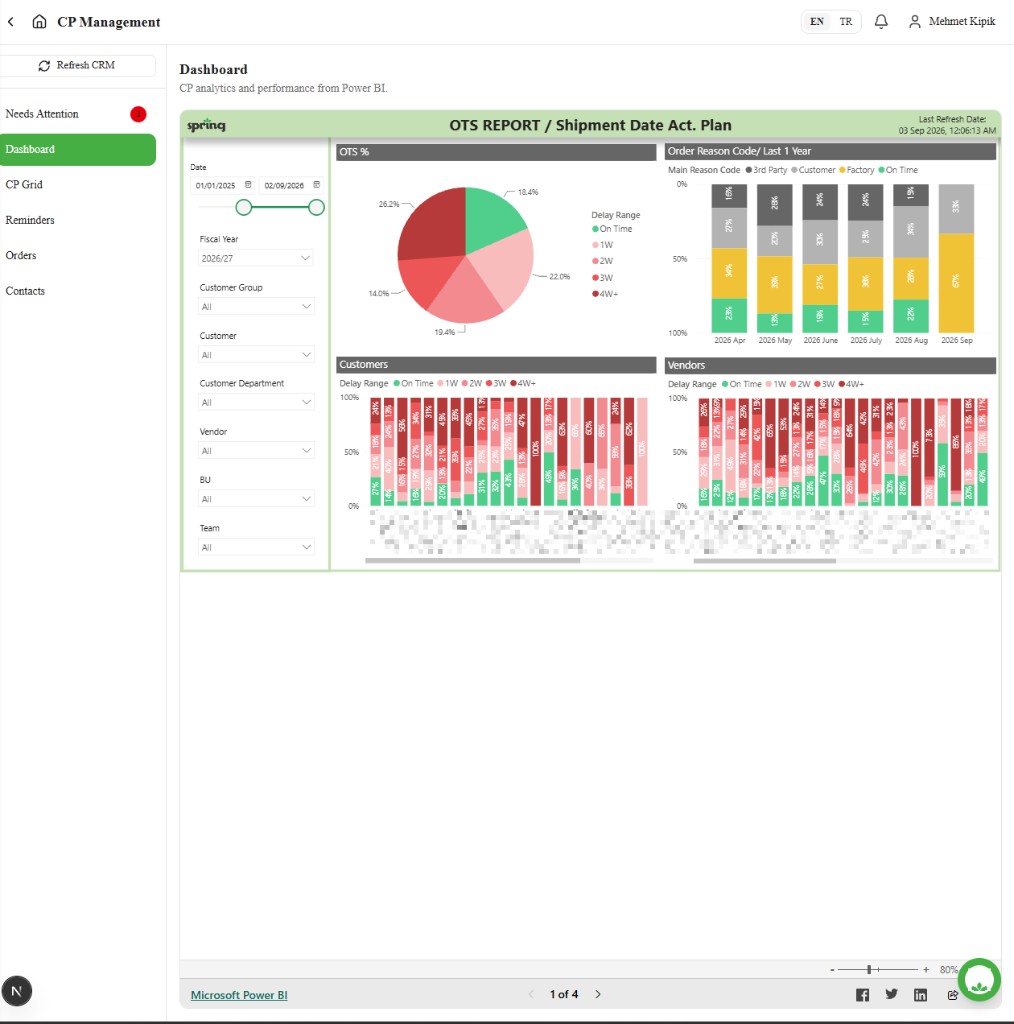
- Open Dashboard.
- Review the embedded Power BI report (for example on-time shipment performance, customer and vendor breakdowns).
- Use the report filters (date range, customer, vendor, team, and others) to narrow the view.
- Use the report footer to move between pages or zoom if needed.
CP Grid
Edit milestone dates, customise which columns you see, export to Excel, and open comments.
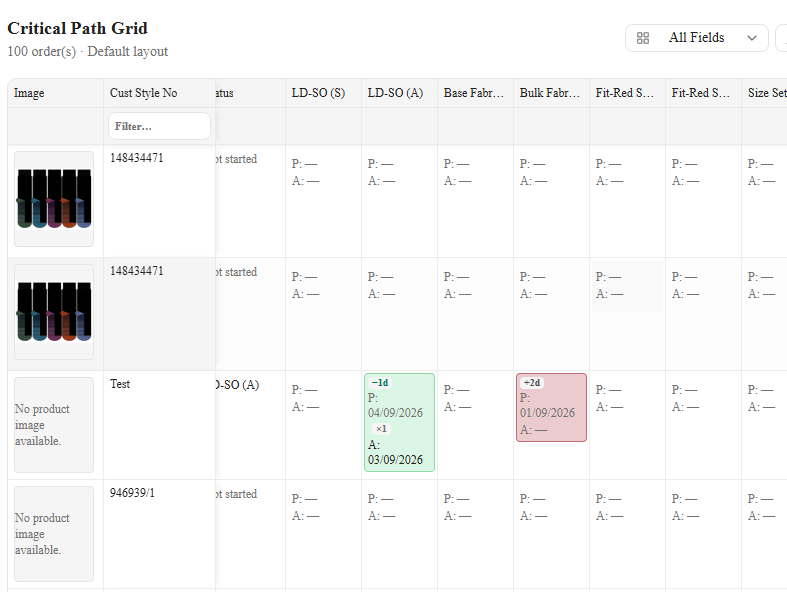
- Open CP Grid (page title Critical Path Grid).
- Locate the order / milestone cell.
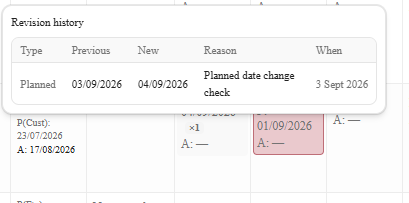
- Hover a milestone cell — the Edit milestone dates tooltip appears. Cells with revisions also show the Revision history table (Previous, New, Reason, When) on hover.
- Click the cell to open the milestone editor and set planned / actual dates using the rules below.
- Click a row (outside a date cell) to open the drawer for order details and Comments (private notes and shared vendor / customer threads) — see below.
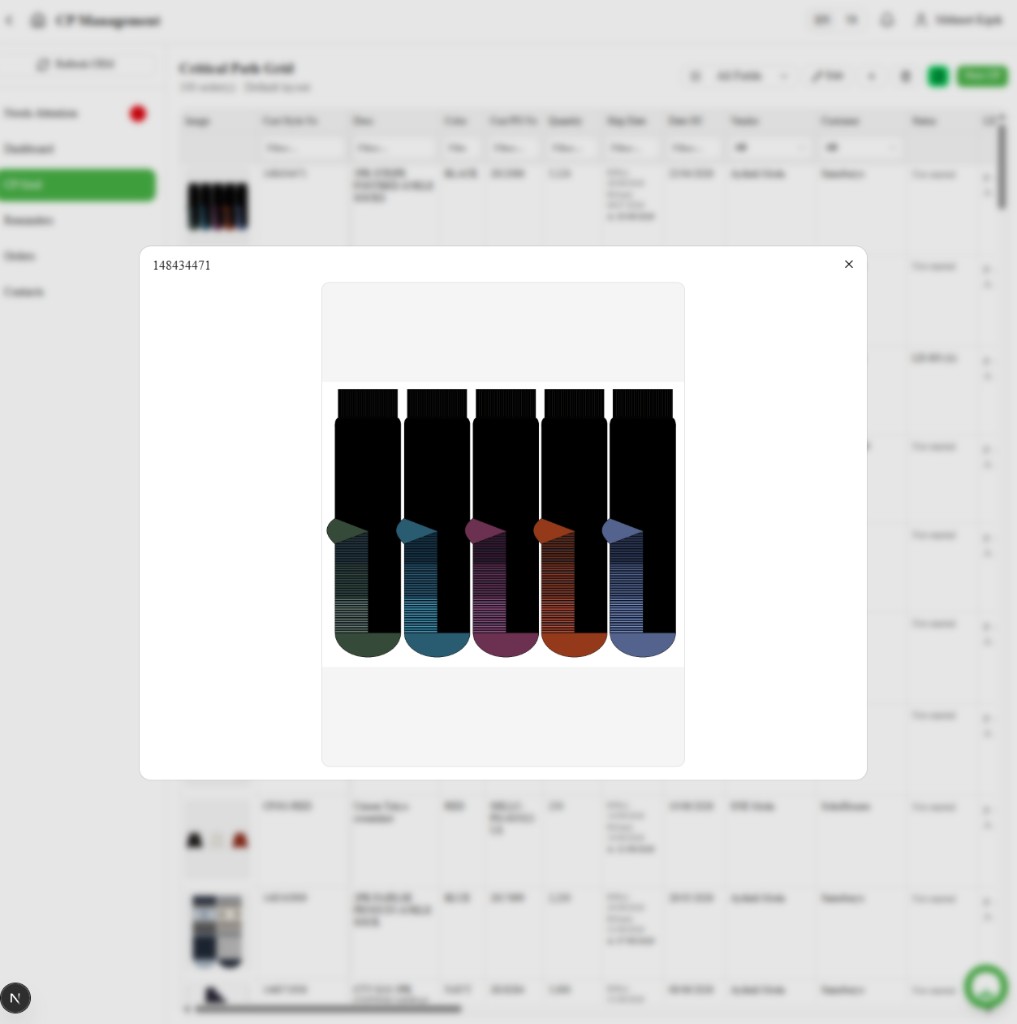
- In the order drawer, click the product image (Click image to enlarge) to open it in full view.
- Use the toolbar actions as needed (View, Edit, New CP, Excel export).
Calendar dates display as DD/MM/YYYY (for example 18/08/2026). Inline, Pilot, and Final inspection dates no longer appear as separate identity columns — they show as Actual on Inline Inspection, Pilot Inspection, and Final Inspection milestones (see Inspection report dates on the grid below).
Views (Default and All)
- Use the View dropdown in the CP Grid toolbar.
- Default — curated milestone columns for day-to-day work. Eight core approvals always stay visible: LD-SO, Bulk Fabric Approval, Fit-Red Seal, Bulk Test, Cut Start Date, Inline Inspection, Pilot Inspection, and Final Inspection. Optional milestones (for example Wash) are hidden.
- All — every milestone column in the layout, including Sending columns and milestones hidden on Default (for example Wash Sending and Approval).
- Default and All are built-in — you cannot rename them, edit their column layout, or delete them. Use + (Create view) to save filters, sort, or a custom column layout on top of a profile.
- If an older saved view looks wrong after an update, switch to Default or All, or open Edit → Reset.
The same Default and All views apply for every customer — you do not need a separate saved view per retailer for day-to-day work.
Sort and filter
- Click a column header to sort. Click again to reverse; a third click clears the sort.
- Type in the filter row under a product / order column to narrow rows.
- Department, Transport, Supplier, and Customer open a dropdown. Tick one or more values. Select all ticks every option; Clear (or untick all) shows every row again. Empty values appear as (Blank).
- Filter and sort choices are saved automatically to the active view (see Saved views below).
Saved views
Save different filter, sort, and column layouts as named views on CP Grid. Views are stored in your browser only — they do not affect what other users see.
- Use the View dropdown in the toolbar to switch between saved views (including built-in Default and All).
- Click + to Create view — enter a name; the new view starts as a copy of the current view.
- Change filters, sort, or column settings in Edit at any time; changes auto-save to the active view (except on built-in Default and All, where Edit is disabled).
- Use Edit to rename the view or adjust columns, or the trash icon to Delete view (you must keep at least one view; built-in views cannot be deleted).
Each layout (for example staff default vs vendor) has its own set of views.
Columns (adjust layout)
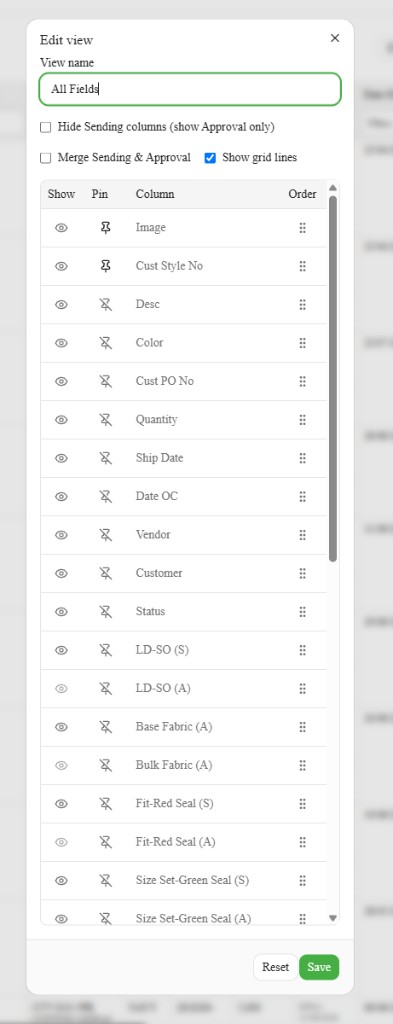
- Click Edit (next to the View dropdown) to open the view editor — not available on built-in Default or All; create a New view first to customise columns.
- Change the View name at the top if needed.
- You can:
- Toggle the eye icon on each column to hide or show it (eight core milestone approvals — LD-SO, Bulk Fabric Approval, Fit-Red Seal, Bulk Test, Cut Start Date, Inline Inspection, Pilot Inspection, Final Inspection — always stay visible on Default)
- Toggle the pin icon to keep columns fixed on the left while scrolling (pins apply from the first column through the row you pin; hidden columns cannot be pinned)
- Edit the Header label for that column (leave blank / clear to use the default name)
- Reorder by dragging the grip handle on the right
- Toggle Hide Sending columns (show Approval only) — hides all Sending milestone columns and keeps Approval (and other non-sending) columns
- Click Save to apply, or Reset to restore defaults.
Column settings are saved to the active view automatically.
Export Excel
- Select the View that matches the filters, sort, and columns you want in the file.
- Click the Excel export button in the toolbar, then choose Export Excel or Sainsbury Export. The button shows Exporting… while it runs.
- Your browser downloads an Excel file named for the active view (for example
cp-overdue-approvals-2026-08-28.xlsx, orcp-sainsbury-overdue-approvals-2026-08-28.xlsxfor Sainsbury).
Export Excel includes only rows visible under the active view's filters, in the same sort order, with the same visible columns and custom header labels. Data is formatted as an Excel table with filter dropdowns on each column. Product cover images are embedded when the image column is visible and the image URL can be loaded.
Sainsbury Export uses the same rows and sort order, but in the Sainsbury critical path sheet layout. Each milestone group has Target Date, Forecast Date, App'd date (or Actual Date) and Var +/- columns. Target is the planned date and App'd / Actual is the actual date. Forecast Date and Var +/- are left empty. Strike Off is empty because LD-SO dates go under Lab Dips. Disabled milestones show N/A.
Use Refresh after exports or heavy edits if the grid looks stale. New creates a CP record when that action is available: pick the order, click Create, and the dialog closes at once — the row appears at the top of the grid and fills in once CRM confirms it.
Planned dates
- Enter a planned date while the cell is still empty.
- After the first planned value is saved, you may revise it once (with a reason) while no actual date exists anywhere on the order.
- Once any milestone on the order has an actual, planned dates that are already set lock. Empty planned dates can still be filled once — any date is accepted, including a past date.
- Disabled milestones (Disable this field for this order) lock both planned and actual.
Actual dates
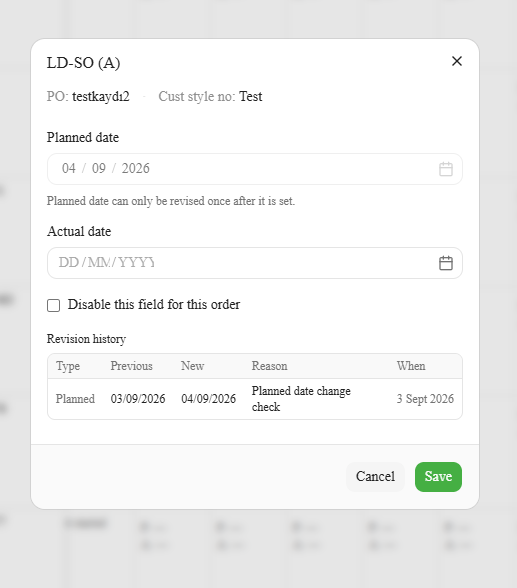
- You can set or change actual while the milestone is not disabled.
- Inline Inspection, Pilot Inspection, and Final Inspection may show an actual date from the order's own CRM Inspection Reports before a critical-path record exists. Those dates are read-only on the grid (see Inspection report dates on the grid below).
- The first time you set an actual, no revision reason is required.
- If you change or clear an actual that already exists, you must enter a Reason for revision. That creates a Revision history entry (Previous, New, Reason, When) and increments the revision counter.
- Changing a planned date (while allowed) also requires a reason and appears in Revision history.
- Notes and messages that @mentioned this milestone appear above Revision history in the editor (Mentioned in messages).
- After any actual on the order, set planned dates lock (empty ones can still be filled once); use Disable this field for this order when the milestone should not be used.
Generate CP Plan
Fill empty planned dates between Date OC and Ship Date (actual) in bulk from the order drawer.
- Open the order drawer from the CP Grid.
- Click Generate CP Plan (top right).
- Review the preview table — Date OC, Ship Date (actual), Cut Start, and each milestone Planned date. The plan covers Lab Dip, Bulk Fabric, Red Seal, Cut Start, Pilot Inspection, Inline Inspection, and Final Inspection. Milestones that already have a planned date show Already set and are skipped. Turkish national holidays are skipped.
- Click Apply N date(s). The whole plan is saved in one step in the background; if CRM rejects it, the earlier dates come back.
Automatic planning
Orders for Sainsbury, River Island, and SNE Moda (status Open or Projection) are planned automatically overnight, using the same dates Generate CP Plan would suggest. An order is planned only when:
- it has Date OC and Ship Date (actual), and ship is today or later
- no milestone has a planned or actual date yet
- every planned date in the plan falls today or later
Other orders are left as they are — use Generate CP Plan for them.
Generate CP Plan is unavailable when the order has no Date OC or Ship Date (actual), when Date OC is not before ship, or when any milestone already has an actual stored on critical path. In that case, fill any empty planned dates one by one on the grid. Inspection-report actuals shown before Submit to critical path do not block the tool.
After you save an actual date
- The editor closes immediately and the milestone updates on the grid and in the order drawer — the write to CRM continues in the background.
- If this was a revision, the ×N badge updates and the reason appears in Revision history (and as a note under Comments).
- Optionally tick Inform vendor and/or Inform customer so they see the date update on their shared thread.
- The item leaves Needs Attention when that milestone is no longer overdue.
If CRM rejects the date (for example someone else changed the same cell first), the grid puts the old value back.
Inspection report dates on the grid
Inspection dates come from the inspection reports linked to this order — not from reports on other POs of the same style. A report counts when it is completed, its type is Inline, Pilot, or Final, and its result is Pass, Cond. Pass, or Done. When an order has more than one counted report of the same type, the latest one is used. The matching milestone column shows that date as actual:
| Grid milestone | Inspection report type |
|---|---|
| Inline Inspection | Inline |
| Pilot Inspection | Pilot |
| Final Inspection | Final |
Orders with status At Forwarder show only the dates stored in CRM. Inspection report dates are not added to them.
- Open the order drawer (click the row).
- If critical-path records are missing, the Inspection report dates available banner lists the dates and offers Submit to critical path.
- Confirm Submit inspection report dates to critical path? — Spring Hub creates or updates the critical-path records in one step. It saves each date as the actual. If the planned date is empty, it gets the same day. Disabled milestones (Disable this field for this order) are skipped.
- Until you submit, the actual is shown on the grid but cannot be edited. After submit, the date stays tied to the inspection report and remains read-only here.
Nightly update: For active orders of Sainsbury, River Island, and SNE Moda (the same parties as Automatic planning), Spring Hub also saves these dates to critical path by itself every night. It works the same way as Submit to critical path. It only fills milestones that have no actual on critical path yet, and it skips disabled milestones and At Forwarder orders. Only reports dated 28/09/2026 or later are saved this way. Older reports are never saved automatically — use Submit to critical path for them.
Revision counter (×N)
- Meaning: How many times an existing actual was revised.
- Increments: Only when you change or clear an actual that was already set (with a reason).
- Does not increment: The first time you enter an actual.
- Where: Badge ×N on the date cell. Hover the cell or open the editor for Revision history (Previous, New, Reason, When). Also shown as Rev on the process bar in the order drawer.
Cell colouring and days
Each milestone cell shows P (planned) and A (actual). Background colour and the small +Nd / −Nd badge show whether the milestone is early, on time, or late.
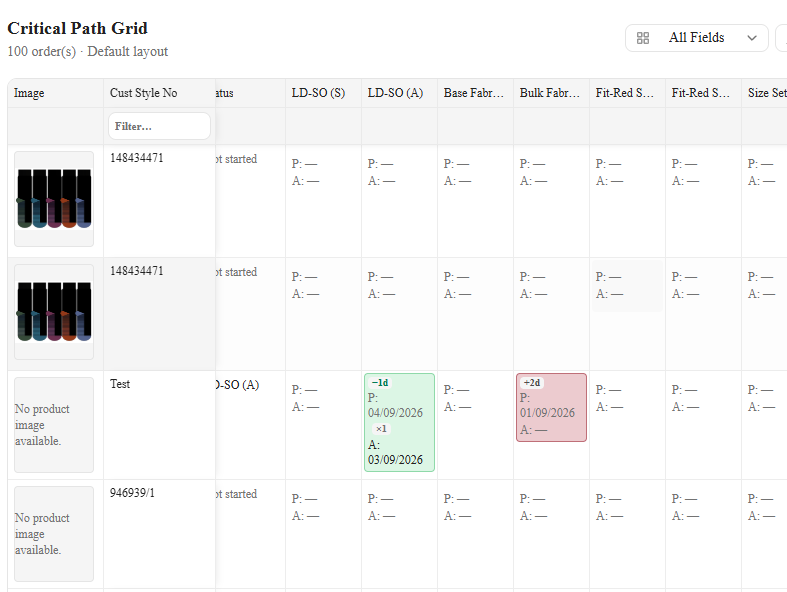
| Look | Example from the grid | Meaning |
|---|---|---|
| Green fill + −Nd | Base Fabric Sending with −3d, P 10 Aug / A 7 Aug | Actual landed before planned (early) |
| Red / pink fill + +Nd | Base Fabric Approval with +3d, P set / A empty | Past planned with no actual yet (overdue), or actual after planned |
| No fill / white | Future milestones with P — / A — | Not started or planned still in the future |
| Yellow | Planned is today, no actual | Due today |
| Muted / faded | Disabled milestone | Field disabled for this order |
The same colours and badges appear on the process bar at the top of the order drawer.
+Nd / −Nd are slip days (not the revision counter ×N):
| Badge | Meaning |
|---|---|
| +Nd | Late — days past planned (open: planned → today; completed: planned → actual) |
| −Nd | Early — actual before planned |
| No badge | Slip is 0, or planned is still in the future with no actual |
Row Status reflects the last milestone (in layout order) that has an actual; otherwise Not started.
Reminders
Personal follow-ups that snooze an overdue milestone off Needs Attention until a chosen time.
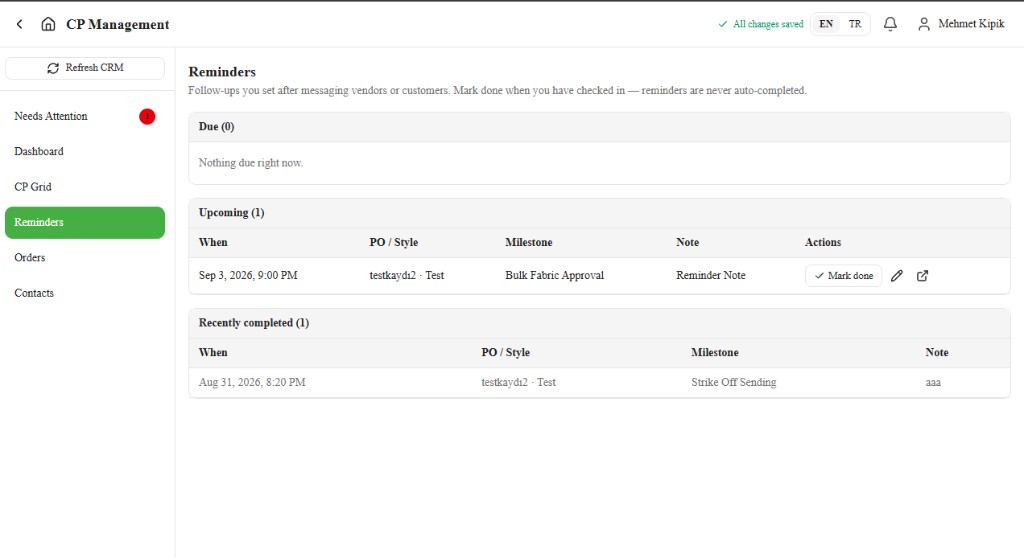
What reminders do
- Tie to one overdue item (order + milestone + planned date).
- Hide that item from the active Needs Attention list until the reminder time.
- When due, notify you and return the item to Needs Attention if it is still overdue.
- Reminders are never auto-completed — you must Mark done after you have checked in.
How to set one
- From Needs Attention, use Snooze, or send outreach then accept Set a reminder?
- Or from Comments on an order that still has an open overdue milestone: open the vendor or customer tab, send a shared message, then complete Set a reminder?
- Choose Date, Time, and optional Note (max 7 days ahead; must be in the future).
- Save reminder or Skip.
When “Set a reminder?” appears after messaging
- The order must still have an open overdue milestone (it is on Needs Attention, or would be if not snoozed).
- Only shared vendor or customer messages trigger the prompt — private notes never do.
- If the order has no open overdue milestone, the message still sends, but you will not see Set a reminder? Use Needs Attention → Snooze on an overdue row when you need a reminder without messaging.
Reminders page
- Open Reminders.
- Work Due, Upcoming, and Recently completed (last 7 days).
- Use Mark done, Reschedule, or Open CP as needed.
Notes, messages, and external outreach
Click an order row on the CP Grid (outside a date cell) to open the order drawer. It shows order and product details, Critical Path dates along the top, and Comments on the right. Click the product image (Click image to enlarge) for a larger view.
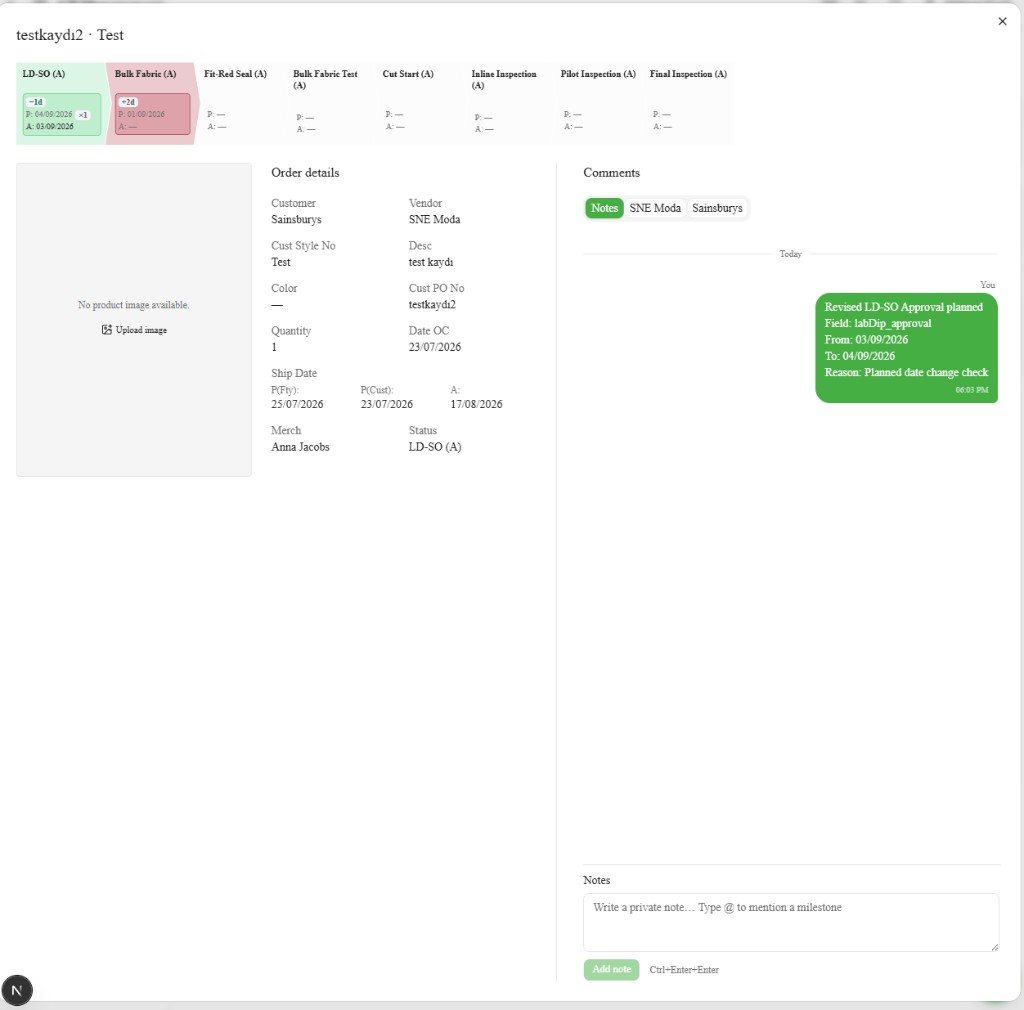
Leave yourself / your team a private note
- Open the order drawer from the grid.
- Under Comments, stay on the Notes tab.
- Private notes are only visible to your team (not the vendor or customer).
- Type in Write a private note…. Type @ to mention a milestone (for example
@LD-SO) so the note appears when someone opens Edit milestone dates for that column. - Click Add note (or press Ctrl+Enter). The note appears in the thread immediately, slightly faded until it is stored.
Date revisions also appear here as notes (from → to, and reason), so the team can see why an actual changed.
Inform the vendor or customer
- In the same Comments panel, open the tab named after the vendor (for example SNE Moda) or the customer (for example Tesco).
- Those tabs are shared threads with that party — anyone who can open the order can read the messages.
- Under To, check who gets the in-app / push notification. It arrives filled in from your Contacts — a line above the list says whether those are the company contacts or this order's own. Change it for this message if you need to, or use Select all to notify every showroom user for that party. You cannot send until at least one person is selected. A change applies to this message only unless you click Always use for this order.
- Type your message and Send to that party (or Ctrl+Enter). Type @ to mention a milestone so the message also shows above Revision history when that milestone's date editor is opened.
- If the order still has an open overdue milestone, Set a reminder? appears after send — Save reminder or Skip. Private notes on the Notes tab never show this prompt.
You can also tick Inform vendor / Inform customer when saving a date revision so the update posts to those same threads. That notifies your saved Contacts for the order, or every showroom user for that party when you have none saved.
The vendor only sees the vendor thread; the customer only sees the customer thread. Your Notes stay private to your team.
External message (Needs Attention)
For paste-ready outreach outside the app (Teams, WhatsApp, Email, or Copy), use Needs Attention → External message. Prefer the vendor/customer tabs (or Inform on save) when you want the conversation kept on the order.
Orders
Order-level critical-path views for orders on your CRM team.
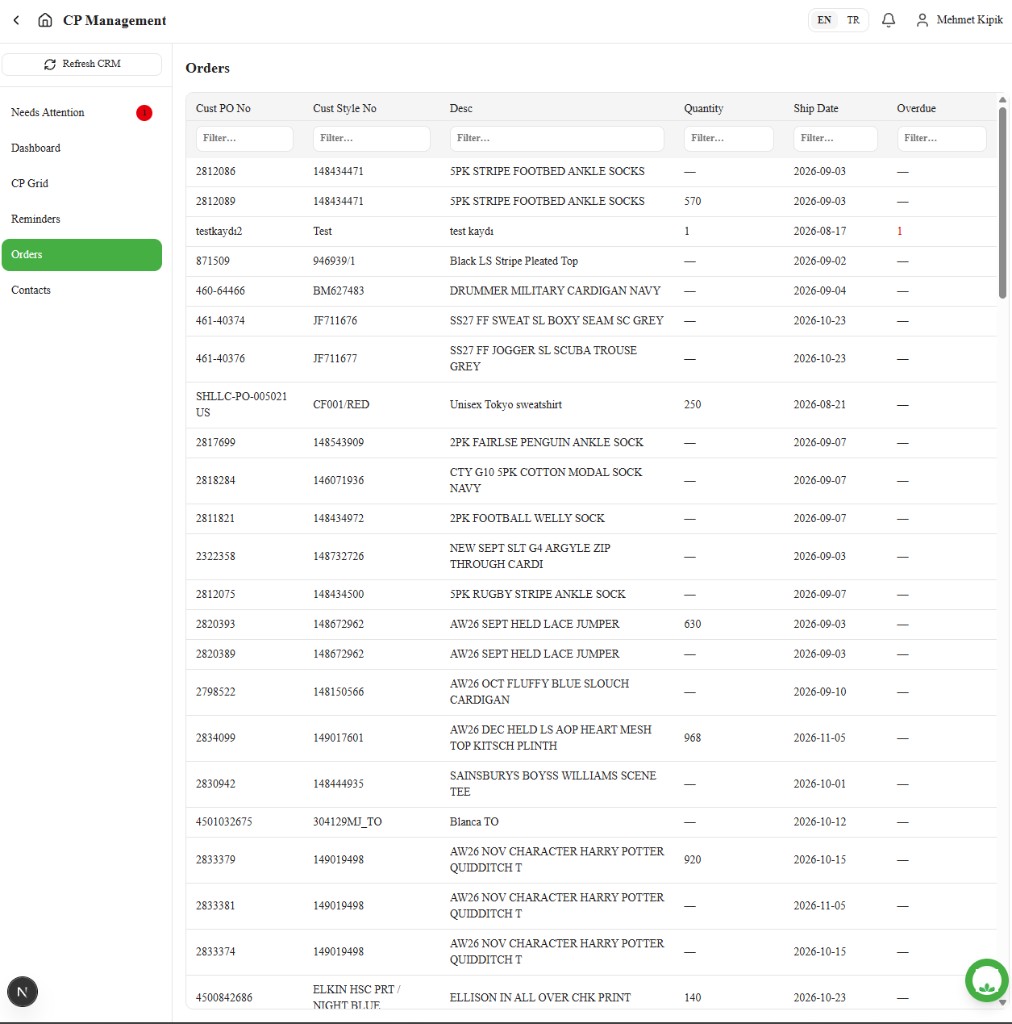
- Open Orders.
- Find the order and open it for timeline / detail work.
Contacts
Decide once who you message at each vendor and customer, instead of picking people every time you send. Your choices are personal — they do not change what colleagues see.
- Open Contacts.
- Choose By vendor or By customer — this is the thread you are setting up.
- Each company in your orders is one row, showing the contacts you message there and how many orders sit under it.
- Use the search box to narrow the list to a specific PO, style, or description.
Set contacts for a company
- Find the vendor or customer.
- Click Set contacts.
- Pick the people (they are the showroom users for that company) and click Save contacts.
Every order under that company now uses those contacts.
Override a single order
Do this when one order needs different people from the rest of the company.
From the order drawer:
- Open the order and go to the Vendor or Customer tab.
- Change the To list.
- Click Always use for this order next to the list. Skip this step if the change is only for the message you are about to send.
From Contacts:
- Expand the company to see its orders.
- Tick the orders, click Override contacts, pick the people, and click Save contacts.
Overridden orders show an Override tag; the rest show Company contacts.
Go back to the company contacts
- In the order drawer, click Use company contacts next to the To list.
- On Contacts, expand the company, tick the orders, click Use company contacts, and confirm.
Where contacts are used
- The To list on the vendor / customer threads arrives filled in from Contacts. Changing it without clicking Always use for this order applies to that message only.
- Inform vendor / Inform customer on a date revision notifies those same contacts. When you have none saved for that company, everyone on that party is notified, as before.
Exceptions and Escalation
- Planned cell will not edit — the order already has an actual and this planned date was already set (or filled once), you already used your one planned revision, or the milestone is disabled.
- Actual revise blocked — supply a Reason for revision.
- Generate CP Plan unavailable — add Date OC and Ship Date (actual) in CRM (OC must be before ship), or the order already has a critical-path actual on a milestone.
- Custom view looks wrong — switch to Default or All, or Edit → Reset.
- Reminder rejected — choose a time in the future within 7 days.
- No orders / unexpected empty list — confirm your employee record has a Team in CRM. Escalate to Merchandising / platform admin if the team looks wrong.
- Dates look wrong — escalate to Merchandising / platform admin.
Related articles
- CP Management — Order Management process
- Spring Hub