Designer Selections Recap
Summary
Designer Selections Recap is where you build selection sheets for a customer visit or review. You create a sheet, add products, share it for review, confirm or drop items with the customer, discuss price and quantity in Customer comments, coordinate with factories in separate Factory comments, update pricing and fabric on products, then finalize with Approved by Customer.
How to
Open the app
- Sign in to Spring Hub.
- Click Designer Selections Recap.
Selection home
Browse existing sheets and start a new one.
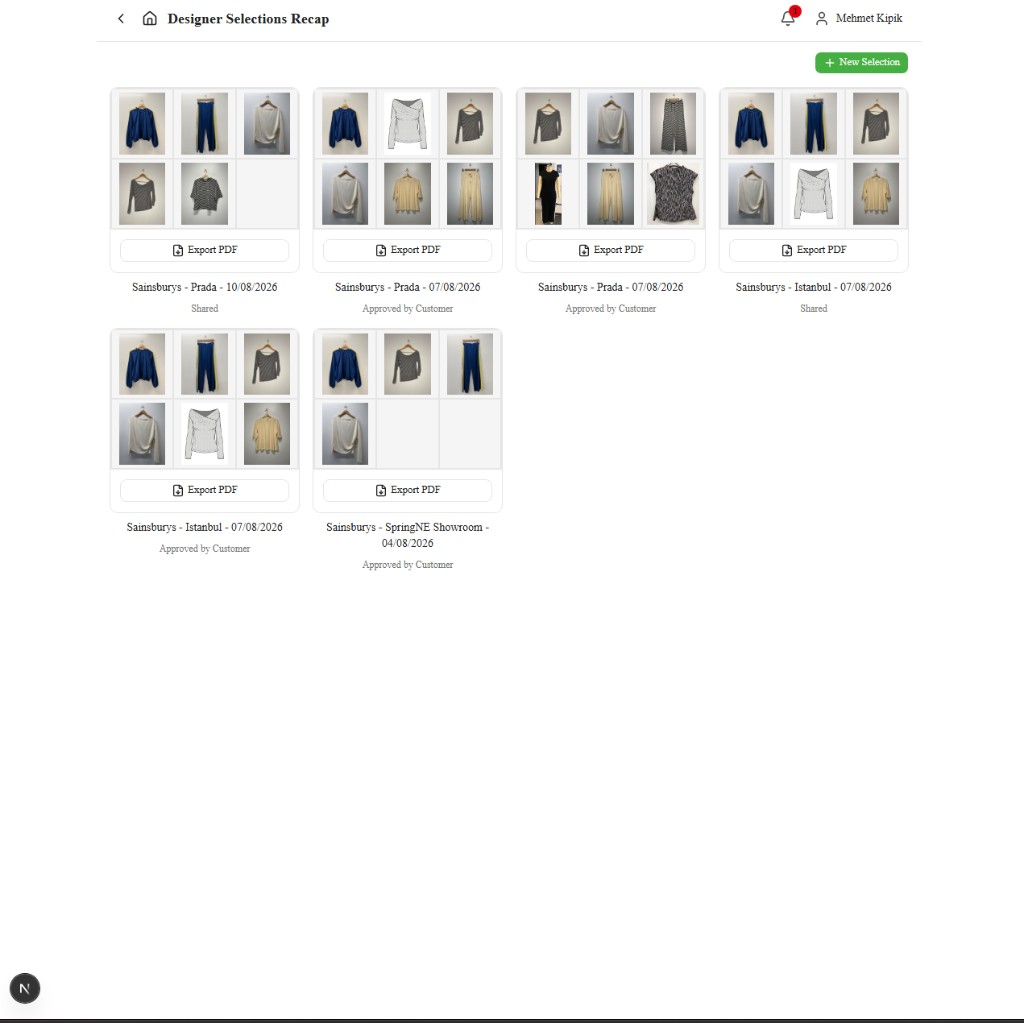
- Review the card grid (each card shows thumbnails, customer / location, date, and status).
- Click + New Selection to start a new sheet.
- Open a card to work inside an existing sheet.
- Use the PDF or Excel icons on a card when you need a file without opening the sheet. Excel has a Selection sheet (header fields) and a Products table (style, phase, factory, fabric, price, qty, status, and actions).
Selection statuses
The badge on each card (and on the sheet) shows where you are:
| Status | Meaning |
|---|---|
| Active | Draft. Build the product list here (add and remove). |
| Shared | Ready for review. Customer sees the full sheet; vendors see only their factory's products. Product list is locked. Confirm / Drop and Comments are available. |
| Approved by Customer | Finalised. Confirm / Drop is locked. Comments and pricing / actions remain available. |
| Inactive | Not used in the normal share / approve flow. |
Typical path: Active → Shared → Approved by Customer.
Step 1 — Create a new selection
Create the first version of a sheet, then click Save.
Open the blank form
-
From Selection home, click + New Selection.
-
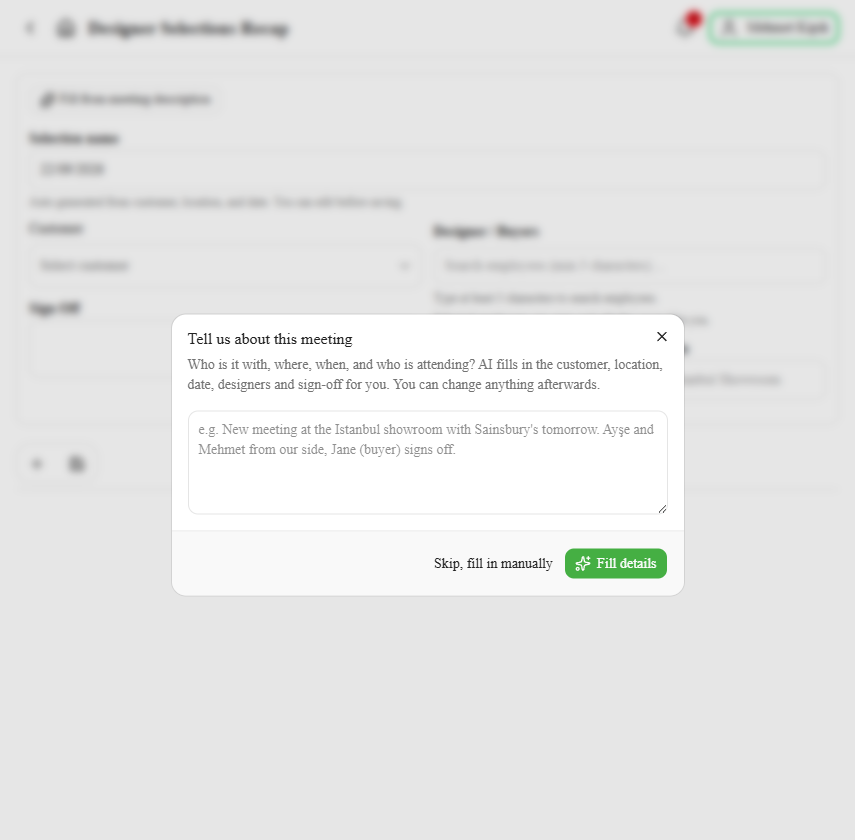
Tell us about this meeting opens first. Describe the meeting in a sentence or two — who it is with, where, when, and who is attending. For example: New meeting at the Istanbul showroom with Sainsbury's tomorrow. Ayşe and Mehmet from our side, Jane (buyer) signs off.
-
Click Fill details. AI fills Customer, Location, Date, Designer / Buyers, and Sign Off from what you wrote. Fields you did not mention stay empty.
-
Or click Skip, fill in manually to go straight to the blank form.
-
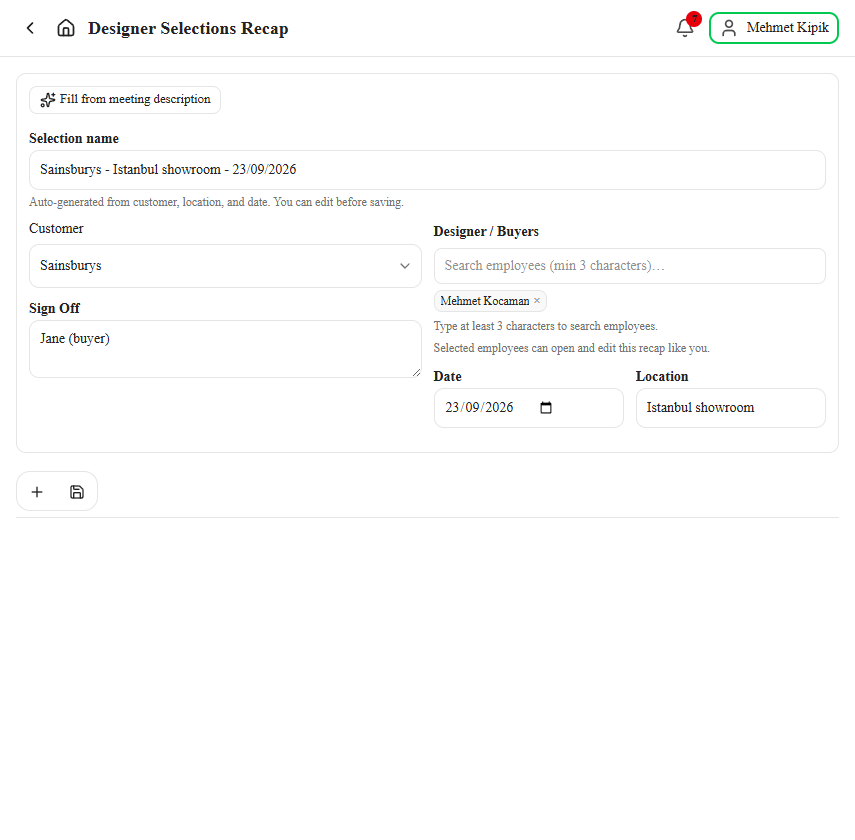
Check the header fields and change anything that is wrong. To try again with a different description, click Fill from meeting description at the top of the form.
Fill the header
Complete these fields before the first save:
- Customer — required.
- Designer / Buyers — type at least 3 characters to search employees, then tick who should share this recap. Selected employees can open and edit the sheet like you. After Save, you can still add people from Share → Employees.
- Sign Off, Date, and Location.
- Selection name — auto-filled from customer, location, and date. Edit it if you need a clearer title.
Once you add products, the header form collapses so product details stay on screen. Click the header bar to expand it again — for example to edit fields before the first Save.
Add at least one product
- Click Add product.
- In the dialog, search by customer style number (Search by cust style no…, at least 4 characters) → Search → Add.
- Or click Upload photos and choose one or more images (JPEG, PNG, or WebP) — you can select several photos at once, one product per photo. Each photo adds one product row:
- Product card photos — AI reads the customer style number on the product identification card and adds the matching CRM product.
- Other product photos (or cards with no CRM match) — added as a bought shopping sample with the photo as its image.
- Or click Manual add for a bought sample that is not in the catalogue.
- On each item, set Phase and Factory. For bought samples, you can also edit Fabric. These stay editable while the sheet is Active (including after the first Save).
Save to create the record
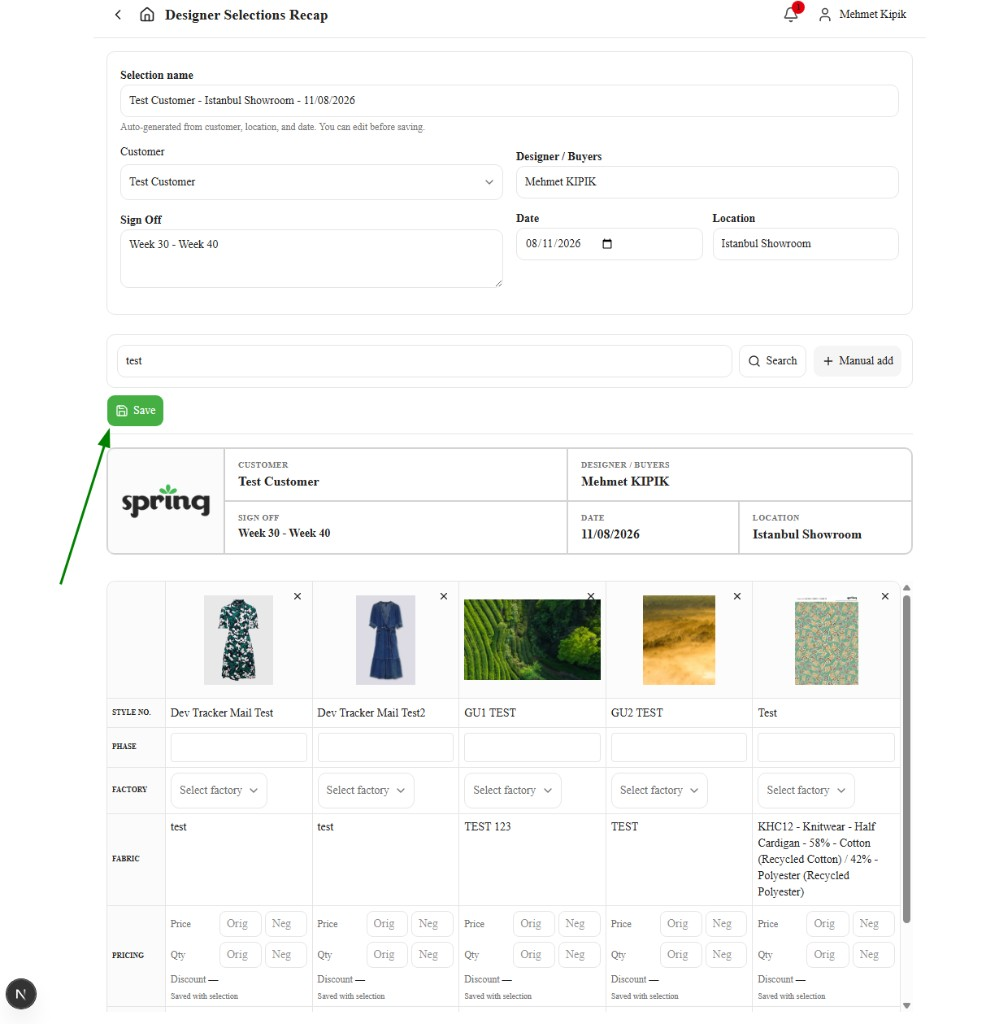
- Check the header and product list.
- Click Save.
After Save:
- The sheet is created and stays Active.
- Header fields lock.
- You can still add and remove products until you share.
Step 2 — Active sheet (build the product list)
While status is Active, finish the product list. You can still add or remove items. The sheet header starts collapsed so the product list stays in view — click it to expand customer, date, and location. When the list is ready, click Mark as Shared.
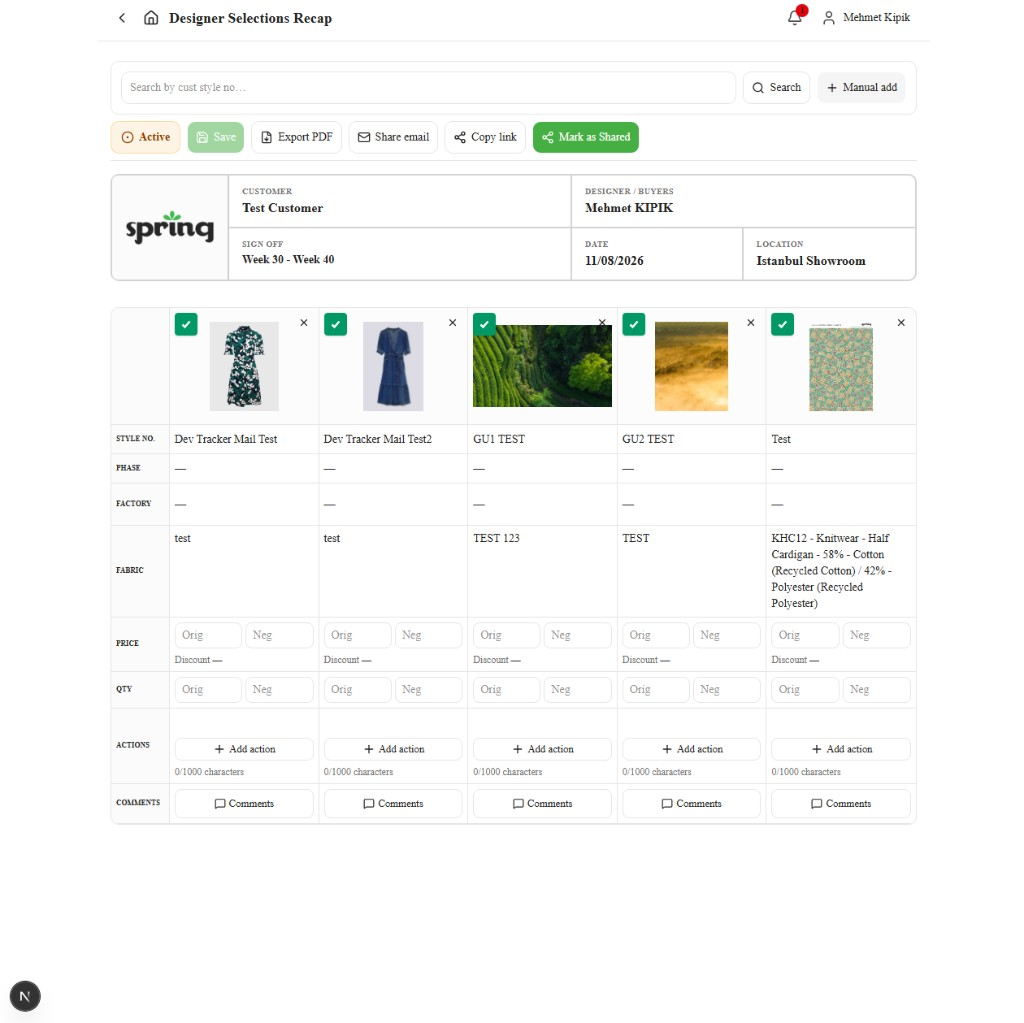
What you can do while Active
- Click Add product, then search by customer style number and Add, use Upload photos to add one or more product photos (AI reads product cards for style numbers), or use Manual add. The product appears in the sheet immediately and saves in the background.
- Remove a product with the × on its image, then confirm Remove. It disappears from the sheet right away.
- Toggle confirm / drop on the checkbox on each image (checked = confirmed).
- Fill or update collection-item fields (see below).
- Use Export PDF, Export Excel, or Share if you need them — sharing for customer review still requires Mark as Shared.
Adds, removes, and field edits do not need a Save step — each change saves in the background.
Collection item fields
Each product column is one collection item. Top to bottom:
| Field | What it is |
|---|---|
| Style no. | Style name or number for the product (or Bought Shopping Sample for manual items). |
| Phase | Phase text for the item (for example a week range). Editable while Active. |
| Factory | Factory for the item. Editable while Active (needed so vendors see their items). |
| Fabric | Fabric / material. Catalogue products edit the product record; bought samples store fabric on the selection item. Use the pencil to edit — the new value shows at once and saves in the background. |
| Price | Orig and Neg price, plus Discount (calculated). |
| Qty | Approximate quantity with Orig and Neg. |
| Actions | Follow-up checklist for the item (+ Add action). |
| Comments | Opens the comment threads (unlocks after the sheet is Shared). Staff see Customer and Factory tabs — customer threads are for price and quantity; factory threads are for production questions only. |
Mark as Shared
When the product list is complete:
- Click Mark as Shared.
- Status moves from Active to Shared at once, and the change saves in the background.
- You can no longer add or remove products — finish the list before this step.
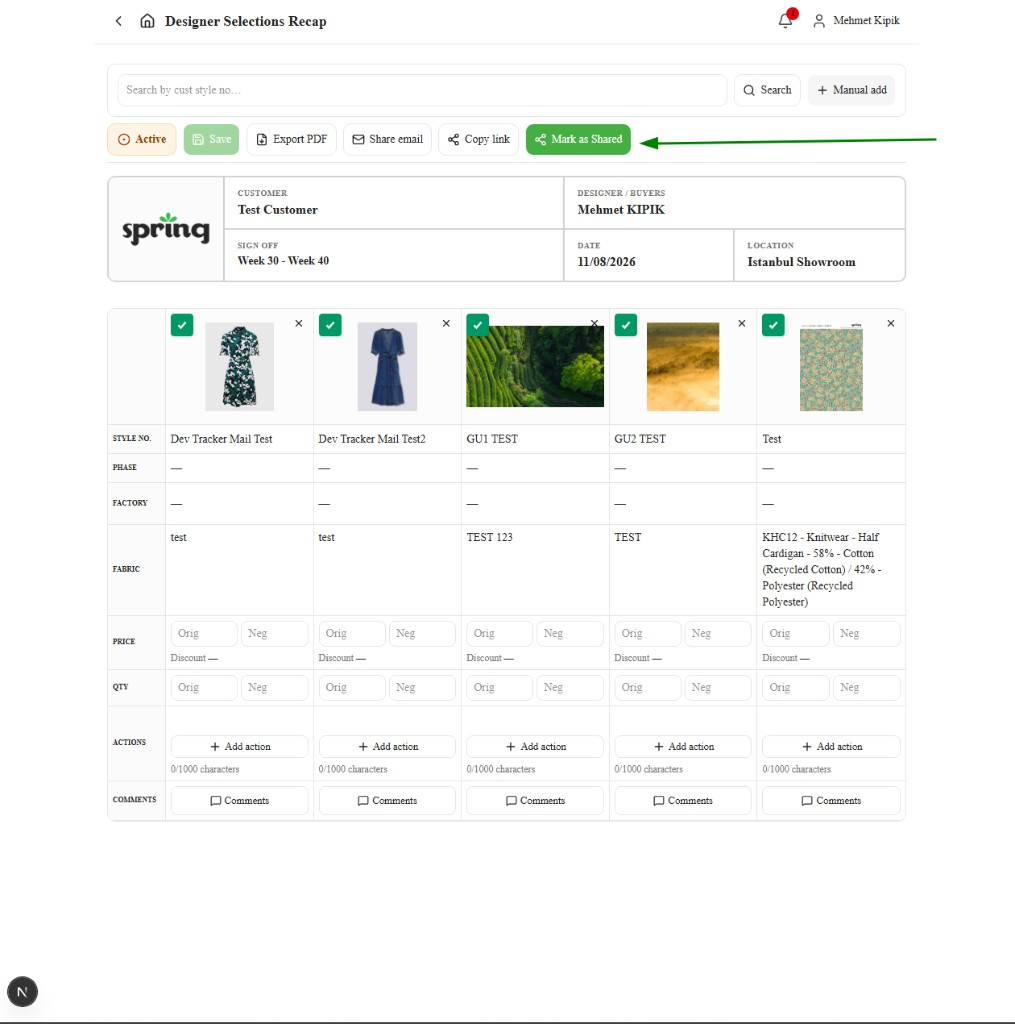
After Shared, Confirm / Drop and Comments stay available for review. Use Share so reviewers can open the sheet (they still need to sign in).
Share selection
Click Share to open Share selection:
| Tab | What it does |
|---|---|
| Link | Copy a recap URL. Anyone with the link can open it after signing in. |
| Enter a To address, preview the prepared subject and message, then Open in email app. | |
| Employees | Search employees and add them to Designer / Buyers. Changes save automatically. Those people can open and edit this recap in Spring Hub. |
Product list rules by status
| Action | Active | Shared | Approved by Customer |
|---|---|---|---|
| Add or remove products | Yes | No | No |
| Phase / Factory | Yes | No | No |
| Fabric (pencil) | Yes | Yes | Yes |
| Confirm / Drop | Yes | Yes | No |
| Comments | Locked until Shared | Yes | Yes |
| Price / Qty / Actions | Yes | Yes | Yes |
| Edit fabric (staff) | Yes | Yes | Yes |
Step 3 — Shared (review with the customer)
After Mark as Shared, status shows Shared. The linked customer can open the sheet. Vendors can also open it, but they only see products where their factory is selected.
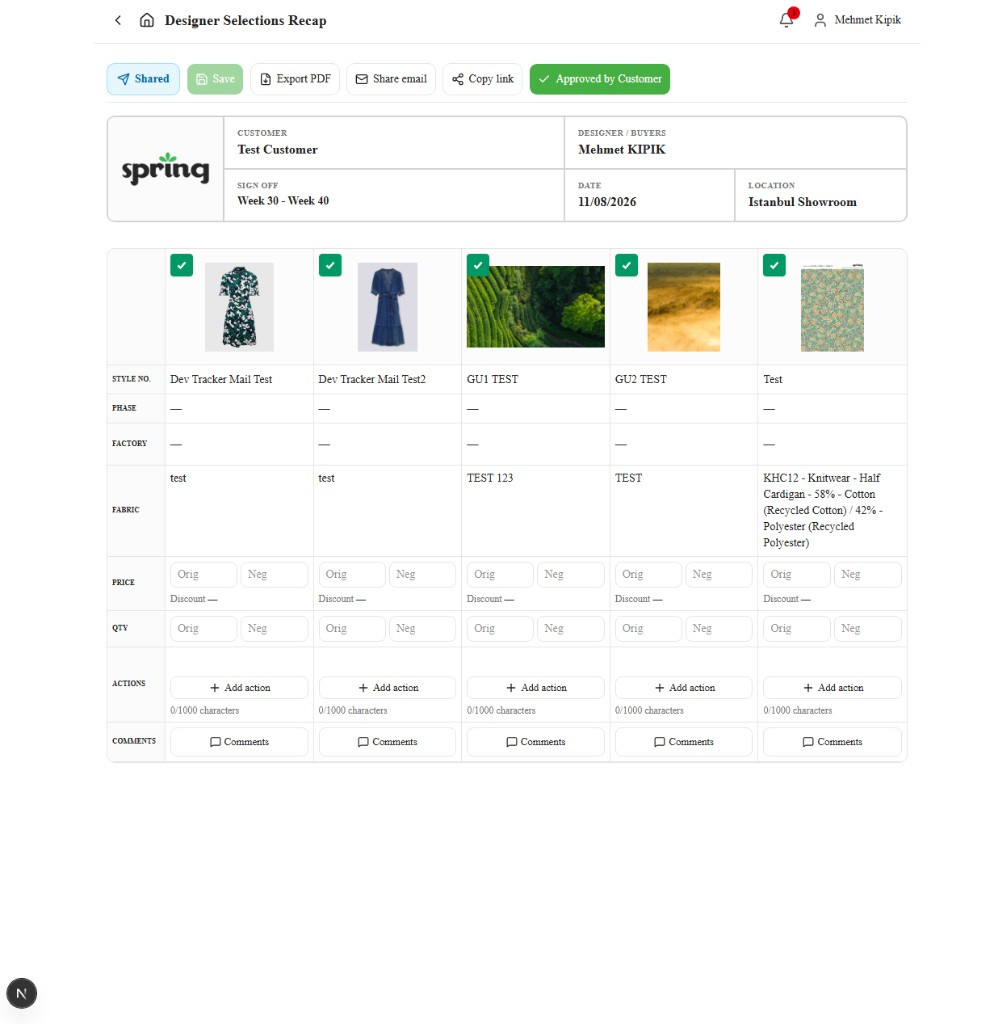
Who sees what
- Customer — the full selection for their account.
- Vendor — only the products assigned to their factory; they can comment on the Factory thread.
- You — the full sheet, including Price, Qty, and Actions, plus both comment threads.
You cannot add or remove products in this status. Finish the list while the sheet is still Active.
Confirm or drop items
You or the customer can confirm or drop each item:
- On the product image, use the checkbox.
- Checked = Confirmed. Unchecked = Dropped.
Each tick saves on its own in the background — there is no Save step for confirm / drop.
New products default to Confirmed.
Finish review — Approved by Customer
When confirm / drop and any discussion are done:
- Prefer the customer to click Approved by Customer.
- You can also click Approved by Customer if needed.
- Status moves to Approved by Customer and Confirm / Drop locks.
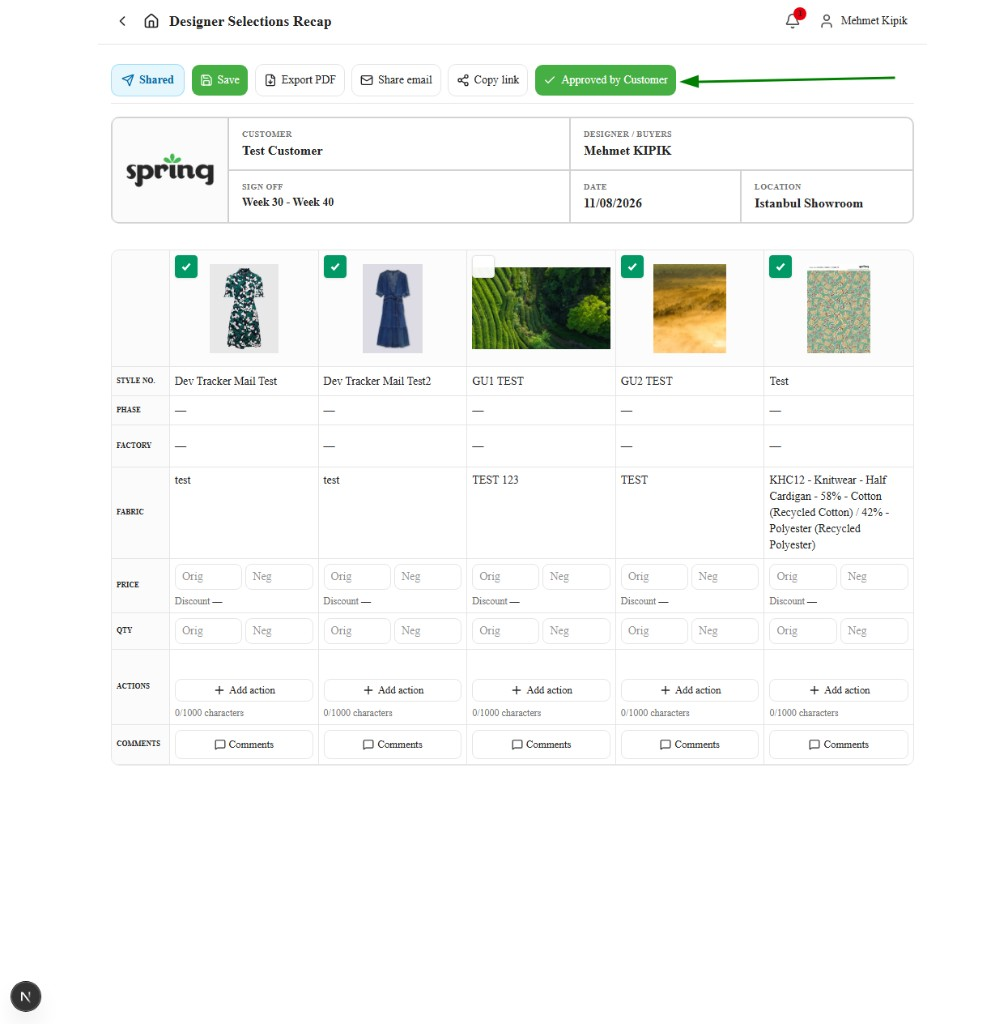
Use Export PDF, Export Excel, or Share anytime if reviewers need another way to open the sheet (they still need to sign in).
Step 4 — Approved by Customer
The view focuses on selected (confirmed) items only. Confirm / Drop is locked. Comments and Price / Qty / Actions remain available.
You can switch comment audience with Customer / Factory, and layouts with the Chat / Table toggle (top right of the product list):
| View | What you see |
|---|---|
| Chat | One card per selected product — details, live comment thread for the chosen audience (Customer or Factory), and Add comment. New messages appear on each card so you can follow several products at once. |
| Table | A grid of selected products with Image, Product name, Phase, Factory, Fabric, Price, Qty, Actions, and Comments. Comments opens a dialog with Customer and Factory tabs. |
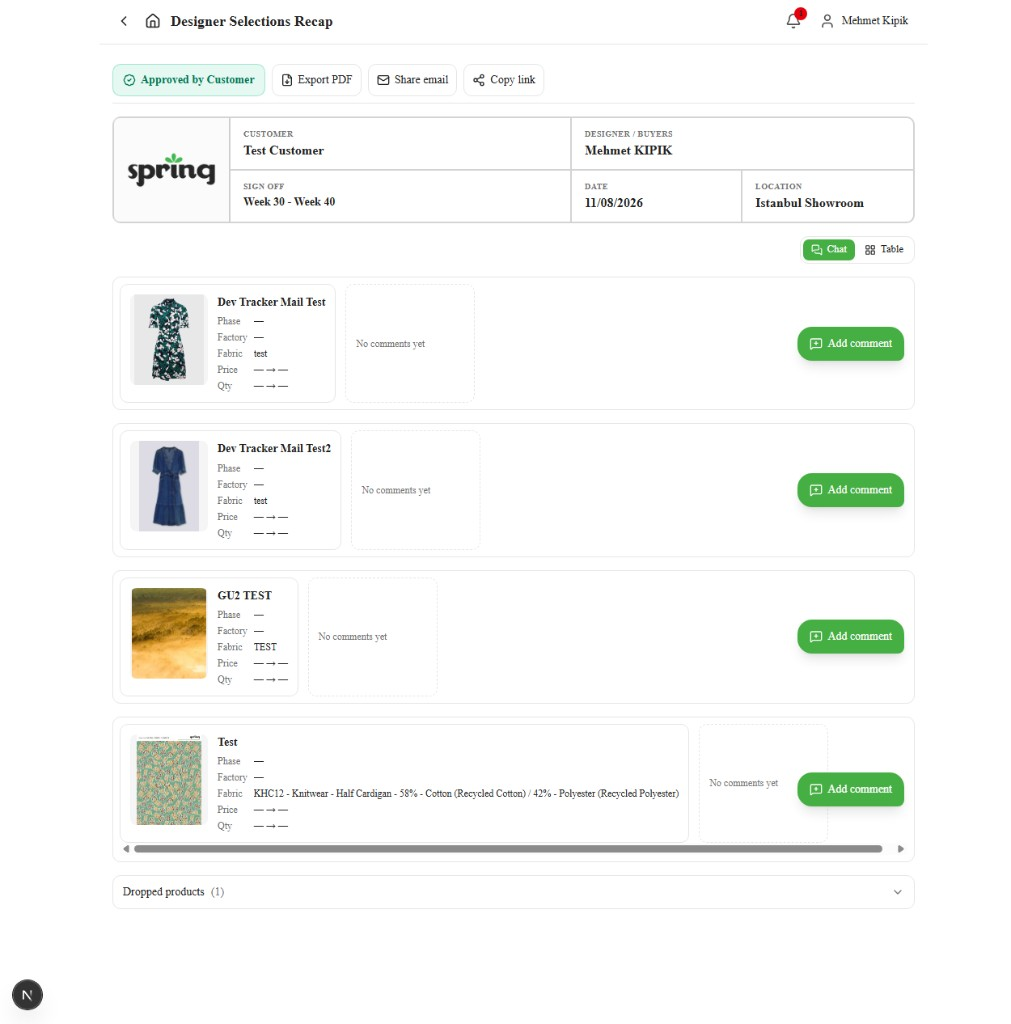
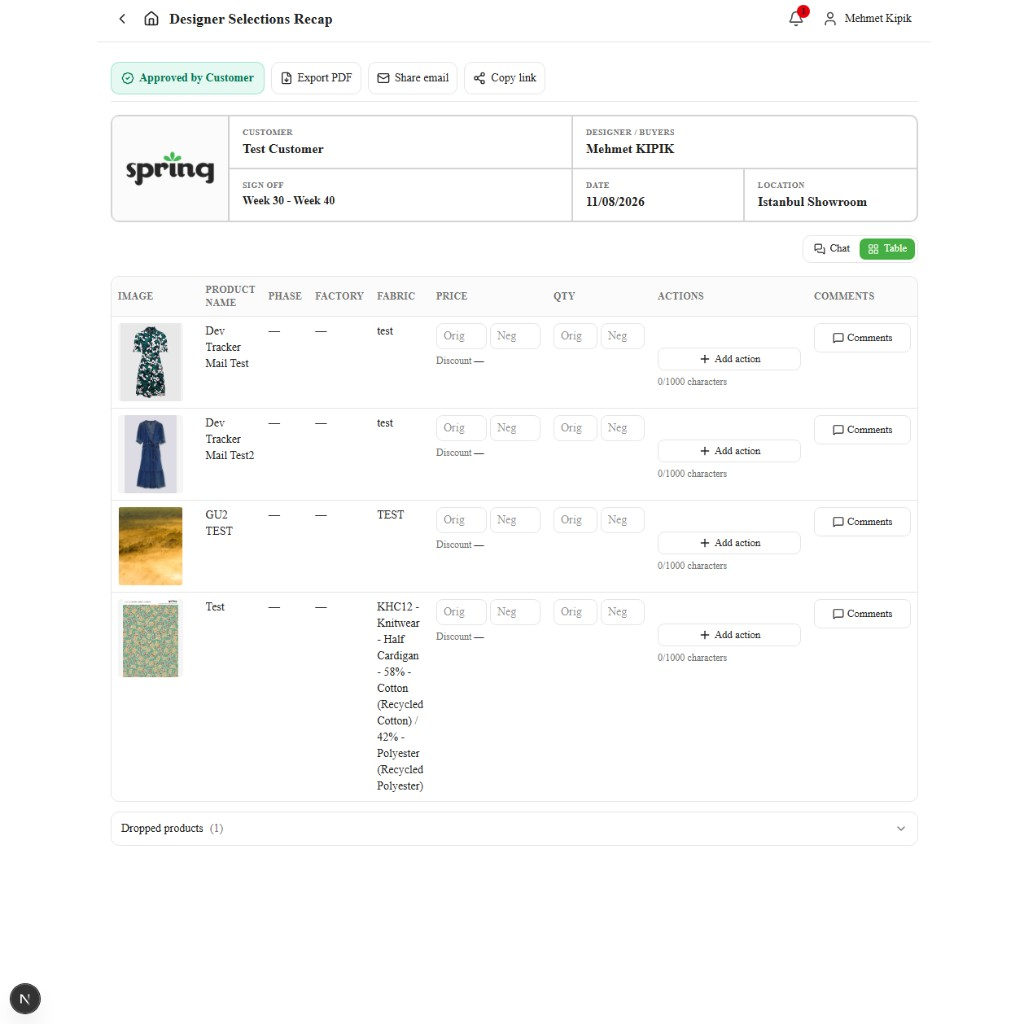
- Status shows Approved by Customer.
- Confirmed products appear as the main list (default Chat; switch to Table if you prefer the grid).
- Each product still shows style, Phase, Factory, Fabric, Price, Qty, Actions, and Comments.
- Dropped products move out of the main list into a collapsed Dropped products (N) bar at the bottom.
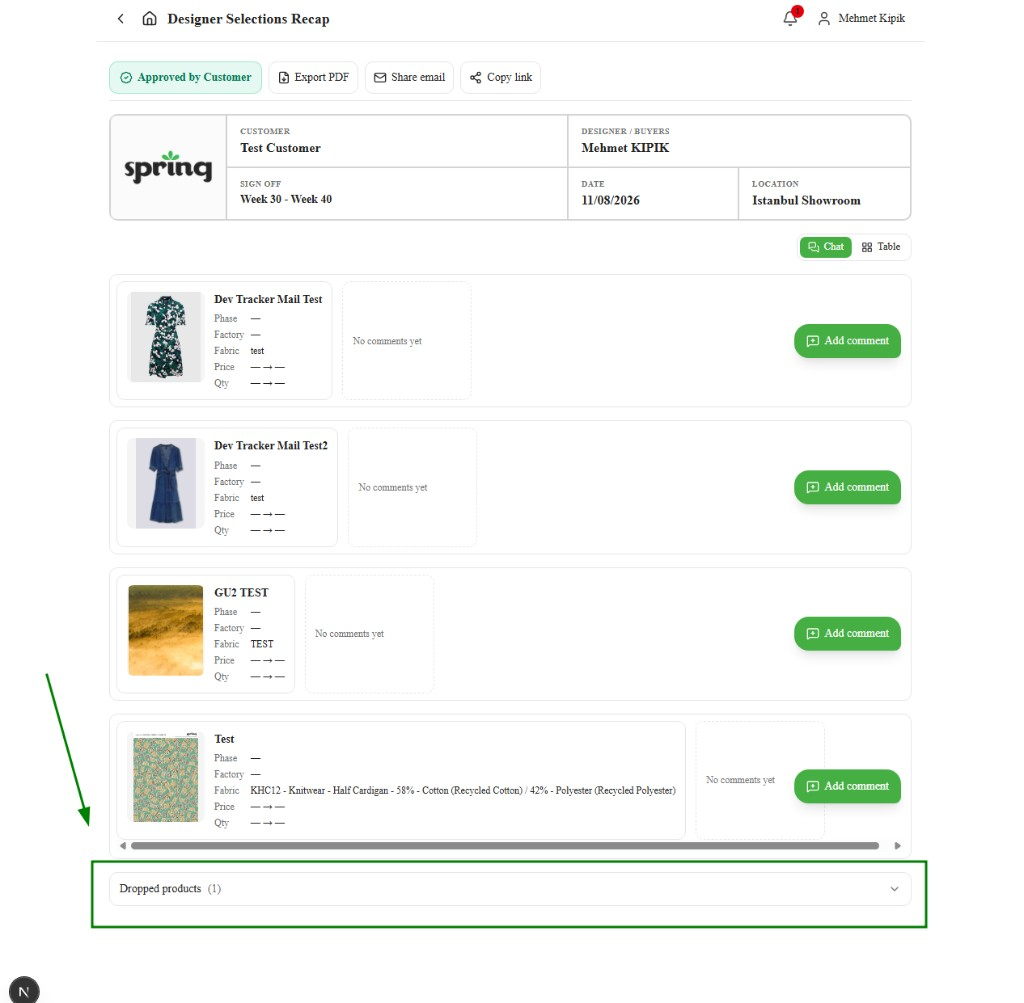
Expand Dropped products (N) when you need to review dropped items (view-only — no new comments). Collapse it again to keep the focus on the selected list.
Use Export PDF, Export Excel, or Share as needed.
Discuss selected products
After Shared (and after Approved by Customer), use Comments on each confirmed product.
Staff comments have two threads:
| Tab | Who sees it | Notes |
|---|---|---|
| Customer | You, shared designers, and the customer | Use this for commercial discussion. AI under a message applies price / qty from it. |
| Factory | You, shared designers, and the assigned factory | Assign a Factory while the sheet is Active before this thread can start. |
Customers only see Customer. Vendors only see Factory. Factory comments appear in amber; customer comments in blue (customer) and green (Merchandising).
In Chat view, pick Customer or Factory at the top, then new messages show directly on each product card — you do not have to open one product at a time to keep up.
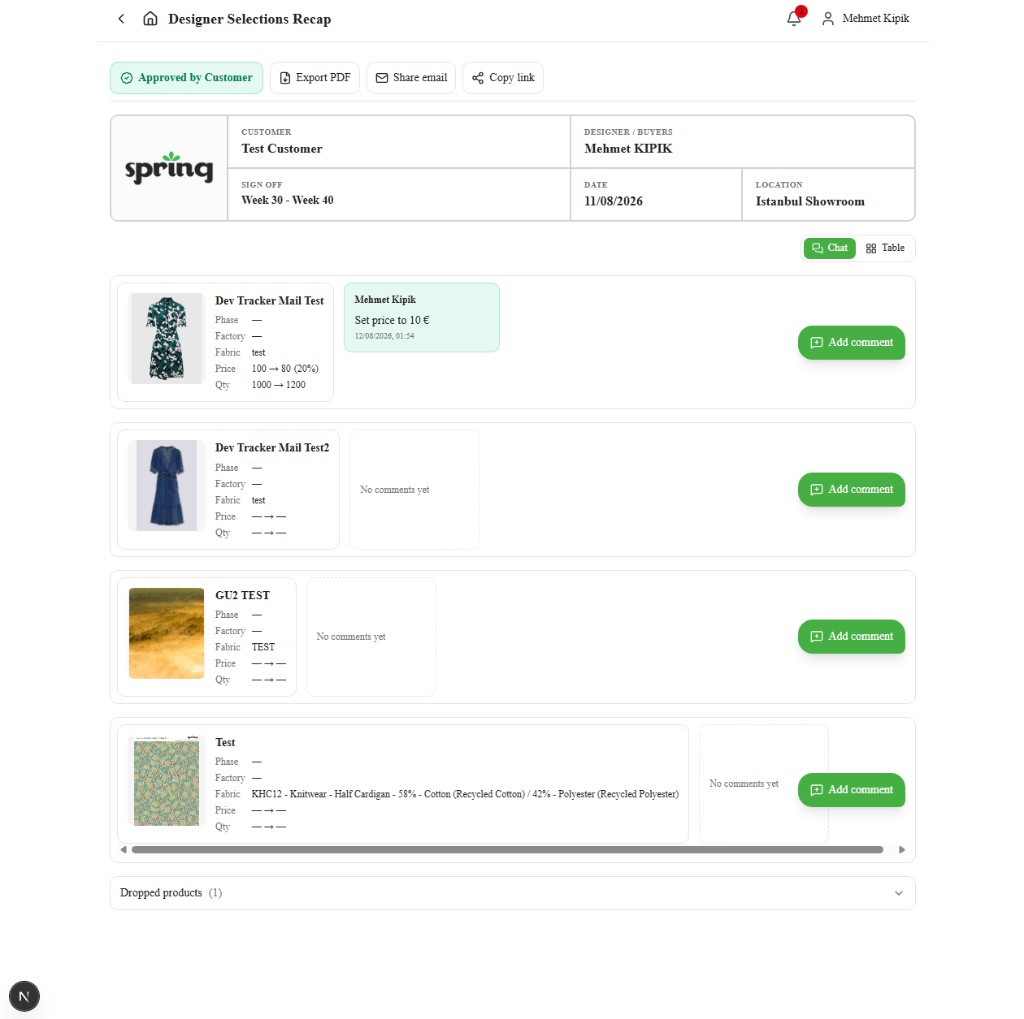
Open the conversation
| Action | What opens |
|---|---|
| Click Comments | Chat dialog for that product — Customer and Factory tabs (staff only) |
| Click the product card / row | Product details (left) and the product chat (right) in one dialog |
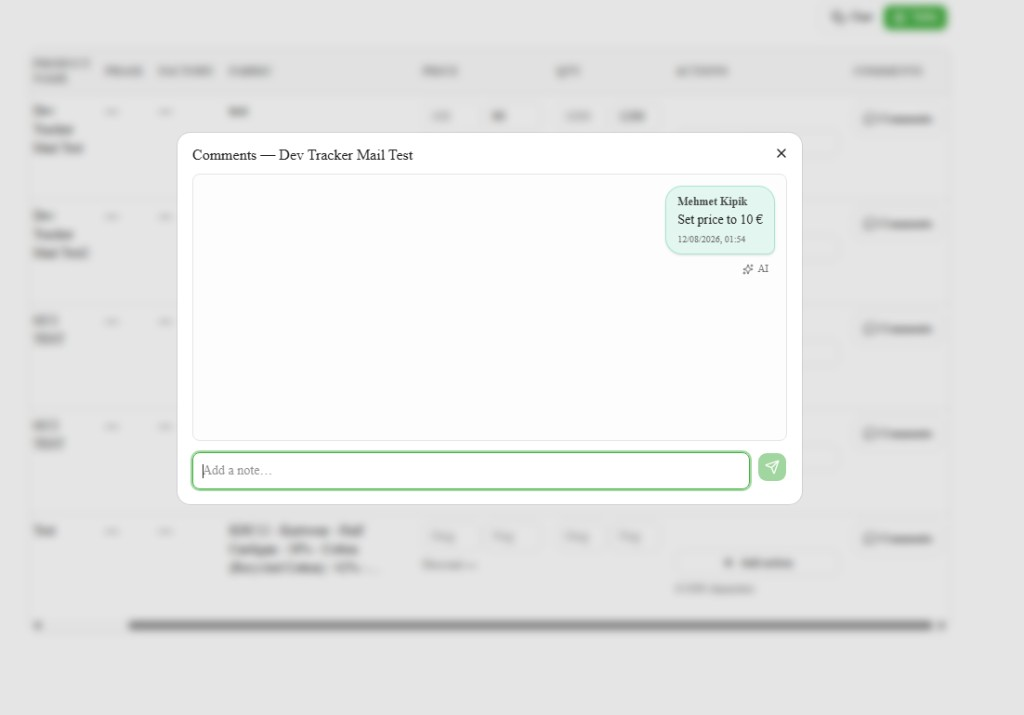
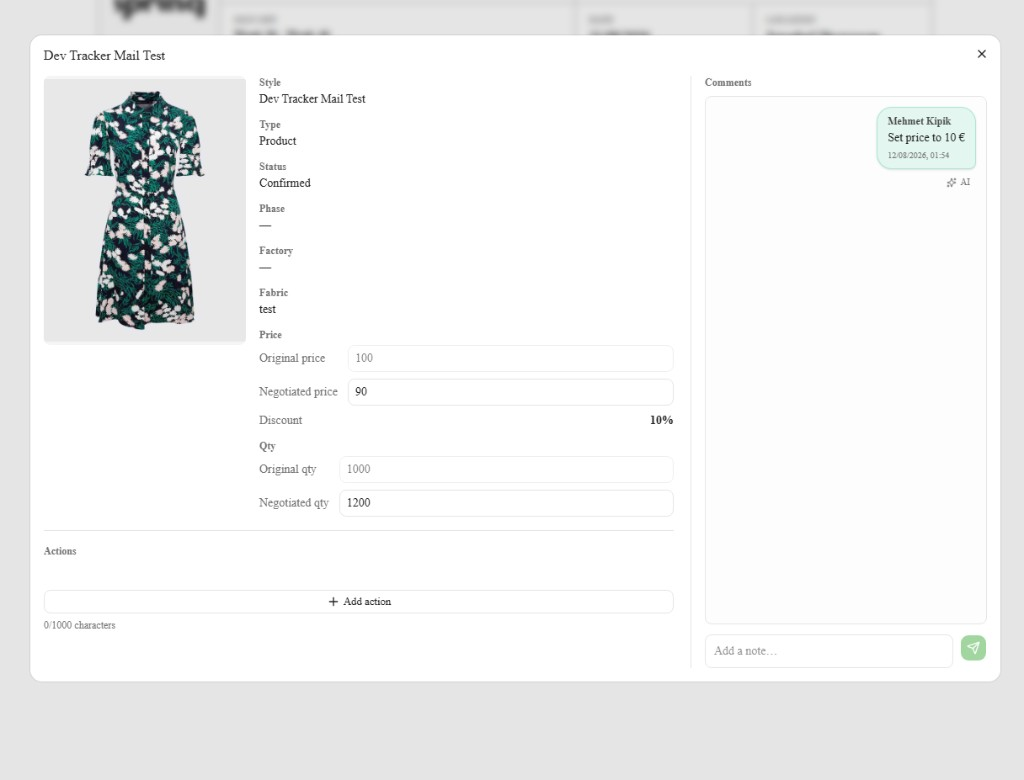
- On the Customer tab, discuss detail, price, and approximate quantity. On the Factory tab, coordinate with the assigned factory. Your comment appears in the thread as soon as you click Send and is delivered in the background.
- As numbers are agreed on the Customer thread, update price / qty on the product (manually in the detail dialog, or with AI below).
If a comment cannot be delivered, it is removed from the thread and the reason shows under the product.
Update price or qty from a message (AI)
When a Customer-thread comment states a price or quantity, you can apply it to that selection item without retyping:
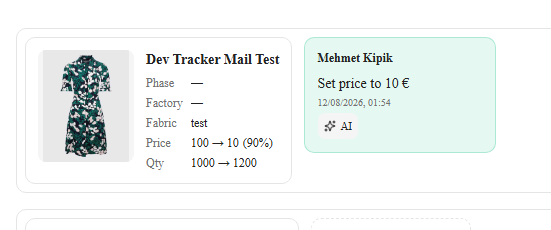
- Under the message, click AI.
- Review Apply from message? — it shows what will change (for example Original price or Negotiated price).
- Click Apply to update the item, or Cancel to leave values as they are. Apply updates the product straight away and saves in the background.
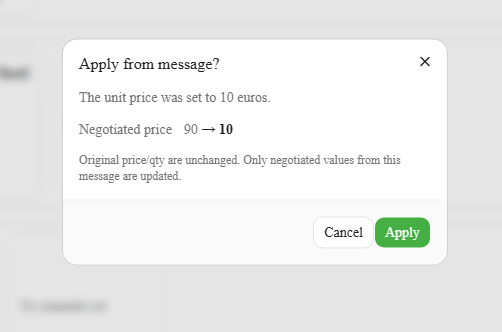
Which value changes depends on what the item already has:
- If original price or qty is still empty, the message fills the original value first.
- Once an original value exists, the message updates the negotiated value instead. The original stays unchanged.
Price and qty are checked separately. AI is not available on Factory threads, on dropped products, or for guests.
Dropped products stay under Dropped products for reference only — existing comments remain visible, but you cannot add new ones.
Comments unlock only after the sheet is Shared.
Pricing and quantity
You set commercial values on each product. Enter original price and qty first, then update negotiated values as the chat continues.
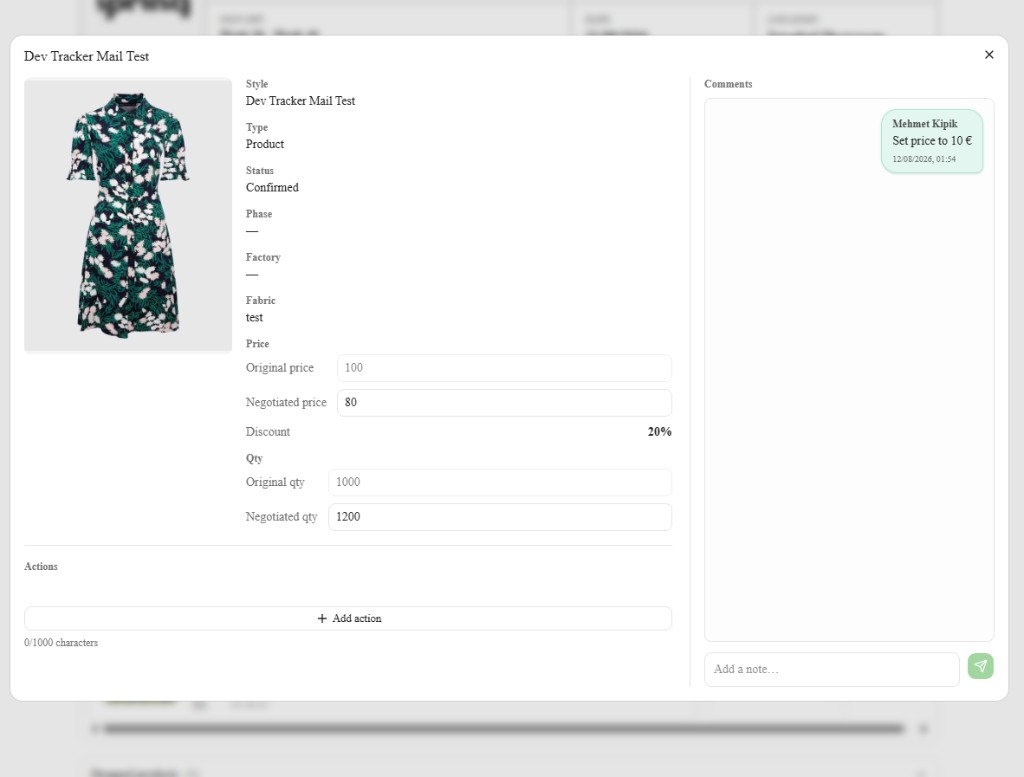
| Field | UI label | Meaning |
|---|---|---|
| Original price | Orig (Price) | Starting price (set once while empty, then locked) |
| Negotiated price | Neg (Price) | Agreed price — update this as discussion continues |
| Original qty | Orig (Qty) | Starting approximate quantity (set once while empty, then locked) |
| Negotiated qty | Neg (Qty) | Agreed approximate quantity — update as discussion continues |
| Discount | Discount | Calculated automatically when original and negotiated price differ |
In Chat view, cards show the same numbers as a compact summary (for example 100 → 80 (20%) for price and 1000 → 1200 for qty).
Values save on blur and show Saved right away; the write continues in the background and the header carries the real status. Update negotiated fields yourself, or use AI under a chat message to apply price / qty from that message (it fills an empty original first, then negotiated).
Edit fabric on a product
Staff can update the Fabric field on a linked CRM product at any selection status. The value comes from the product Material field in CRM and appears as Fabric on the selection sheet.
Open the editor
Use either entry point:
- Sheet grid or mobile card — on the product column, find Fabric and click the pencil icon next to the value.
- Product detail dialog — after Approved by Customer, open Chat or Table view, click a product card or row, then click the pencil next to Fabric.
Update the material
- In Edit material, type the fabric composition, or search components and pick one from the list.
- Or click Upload image and choose a photo of a fabric card or label (JPEG, PNG, or WebP). AI reads the composition and fills the Material field — review the text before saving.
- Click Save.
Saving updates the Material field on the linked product record in CRM. The sheet shows the new Fabric value immediately.
When fabric edit is not available
- Manual add (Bought Shopping Sample) items have no linked product — Fabric shows —.
- Guests (customers and vendors) cannot edit fabric or use image extract.
Quick path
- Create an Active sheet → add products → Save.
- While Active, finish collection items — add or remove as needed — then Mark as Shared.
- While Shared, confirm or drop with the customer (each tick saves itself; vendors see only their factory's products) → Approved by Customer.
- On Approved by Customer, work the selected list; expand Dropped products only when needed. Keep Price, Qty, Fabric, and Actions up to date.
Exceptions and Escalation
If a shared sheet is not visible to the intended reviewer, confirm it is Shared and linked to the correct customer. Escalate access issues to IT.