Inspection Reports
Summary
Inspection Reports is the Spring Hub tool for staff quality control (QC) inspectors. Pick a CRM product, its purchase orders and the PO PDF on one setup page. Then capture the packing list and evidence photos, run AI against the QC checks, record defects, and set Quality / Measurement / Quantity outcomes. Finish with the Inspection Report, which you can preview, print, or save as a PDF. A report assistant can make changes for you from what you type or say.
How to
Open the app
- Sign in to Spring Hub with your Microsoft work account.
- Click Inspection Reports (Create garment QC inspection reports with photo capture and AI analysis).
- A new inspection opens on the setup page (see Start a new inspection). Inspection Type defaults to Final until you change it on Report Details.
Start a new inspection
Product, orders and PO PDF are on one page. The report opens when you click Start inspection.
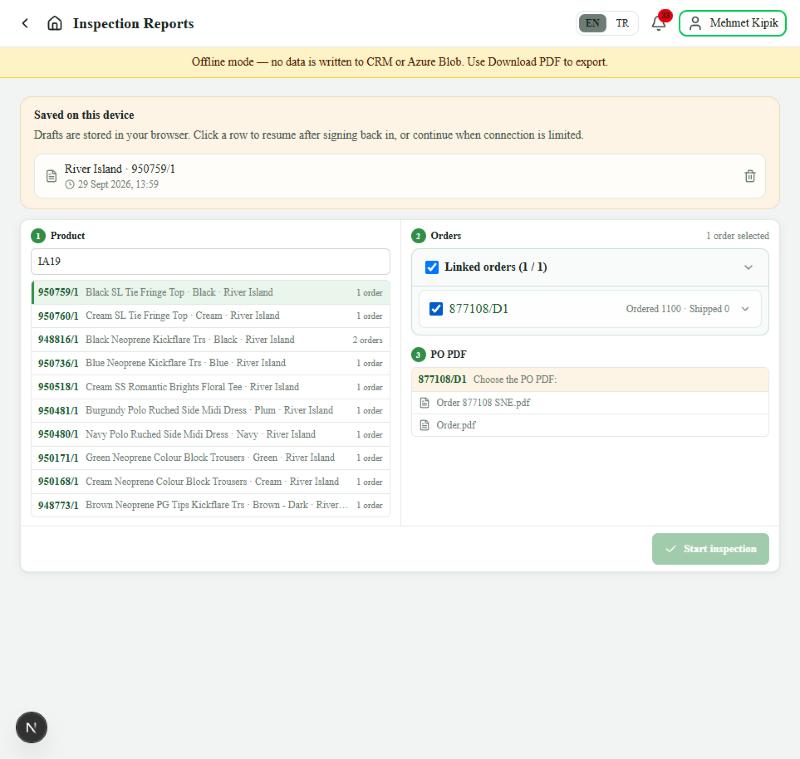
- Under 1 Product, type the customer style no in Find product. You can also search by customer PO or Spring style. Orders that are closed (for example Shipped, Cancelled, or Paid) do not appear in the search. Orders at the forwarder still appear.
- Click the product in the list. Each row shows the style no, description, colour, customer and how many orders it has.
- Under 2 Orders, tick the order to inspect. To combine related orders in one report, tick them as well, or tick Linked orders to select all.
- Under 3 PO PDF, check the purchase order PDF for each order:
- When the order folder has more than one PDF, click the right file under Choose the PO PDF:. The suggested file is starred.
- When one PDF is linked, it is listed with its file name.
- When no PDF is found, you can upload it on Report Details after you start.
- Click Start inspection. It stays greyed out until each order has a PO PDF chosen (when there is a choice).
Expected result: The report opens on Report Details with the order fields filled in from CRM and the PO PDF.
The app reads sizes and ordered quantities from the PO PDF. Sainsbury's PO layouts are read directly; PO PDFs from other customers (for example River Island) are read by AI.
Header
The header stays visible while you work. Use it to track draft status, Quality / Measurement / Quantity outcomes, the Manuals & PO reference, and which step you are on.
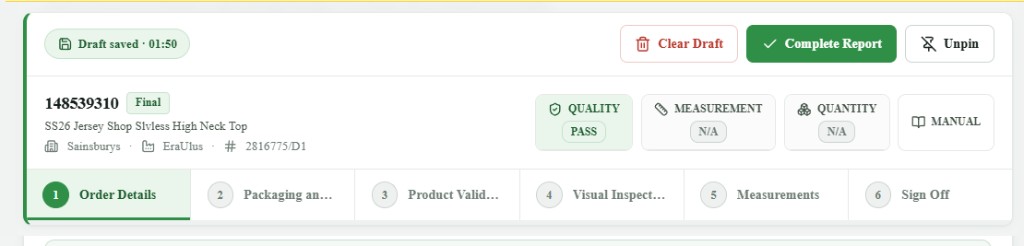
| Area | What it shows |
|---|---|
| Draft saved | Autosave status (with time). Progress is kept as you move through the form. Your work is also stored on this device so you can resume after signing back in or when connection is limited. |
| Manuals & PO | Opens the packaging guide, the measuring guide and the PO PDF for this inspection. |
| Edit orders / PO PDF | Opens the order and PO PDF tools at the top of Report Details: add or remove orders, choose a different PO PDF, or upload one. Click it again to close them. |
| Clear Draft | Discards the whole inspection (cannot be undone). |
| Complete Report | Finishes the report when required fields are done. |
| Pin / Unpin | Pins or unpins the report header so you can keep order details visible while scrolling, or let it scroll away. |
| Hide header / Show header | Shrinks the header to one slim line with the model no and current step. Show header puts the full header back in the page. |
| Model / style line | Model no, a badge with the attempt and inspection type (for example 1st Final), model description, customer, vendor, and PO reference. The attempt number goes up only when the previous inspection of the same type on that order failed; it is saved to CRM with the report. |
| QUALITY / MEASUREMENT / QUANTITY | Each check part title tints with the outcome: green for Pass, amber for Conditional Pass, red for Fail (including a packing-list vs PO quantity mismatch). The label underneath is Pass, Fail, Conditional Pass, N/A, or — until set. |
| Step row | Report Details → Packaging → Product Validation → Visual Inspection → Measurements → Sign Off. The active step is highlighted. Inside a step, the title shows the full section name (for example Packaging and Labeling). |
Packaging manual reference
After the report starts, Manuals & PO appears in the header.
- Click Manuals & PO.
- On Packaging, review the resolved manual section title, page number, and preview image (for example 1.3 Tops / Vests · Page 8).
- Click the preview image to open the full page in a new tab if you need more detail.
- Use PO PDF to view the purchase order, or Open in SharePoint.
- Close the dialog when finished.
The app picks the manual page from product context in CRM (style description, department, category, and related fields). If no page matches, the dialog explains that no packaging manual page was found — confirm product classification in CRM or escalate to QC / IT.
Saved on this device
Inspection Reports keeps a local copy of your in-progress work in the browser on the device you are using.
- When you start a new inspection, look for Saved on this device above the setup page if you have unfinished work from an earlier session on the same browser.
- Click a draft row to open it (setup in progress or an in-progress report).
- After you start an inspection, open the report again from the same URL (
/apps/inspection-reports/{id}) or from Saved on this device.
While you work: Sections 2–5 (photos, measurements, defects, comments) save to this device as you go. You can fill those sections when CRM or AI is unavailable; run Analyze with AI when you have connection again.
Closing the tab: If you try to close or refresh the browser tab while draft data exists, the browser asks you to confirm so you do not lose work by mistake.
Limits: Local drafts stay on the same browser and device. They are not shared with other people or other computers. Clear Draft removes both the server copy and the local copy on this device. To free space without opening a report, use the trash icon next to a draft in Saved on this device, or Remove all when several drafts are listed.
Footer
The footer stays at the bottom of every step.

| Control | What it does |
|---|---|
| Back | Returns to the previous step. |
| Step X / 6 | Shows your place in the wizard (Report Details through Sign Off). |
| Report Preview | Opens the Inspection Report preview at any time (does not require completion). |
| Next | Saves progress for the current step and moves forward. On Sign Off, this control is replaced by Complete Report. |
Report assistant
The report assistant changes the open report from what you type or say. It shows every change on a card first. Nothing changes until you click Apply.
- Click the Spring AI button at the bottom right of the report.
- Type what to change, or click the microphone and say it. Pick the dictation language (EN or TR) next to the microphone first.
- Read the Confirm change card. Each line shows the value before and after. Lines under Also changes are results that follow from the change (for example Quality result Fail → Pass).
- Click Apply. To drop the change, click Discard and say what to do instead.
- To take back the last applied change, click Undo on its card.
Expected result: The report shows the new values and saves like any other edit.
| Area | What you can ask for |
|---|---|
| Defects | "Move the major defects to minor", "Add 2 minor stain defects", remove a defect, change a quantity or a comment. |
| Measurements | "Set all waist measurements for size 10 to +5" (Spec + 5), "Fill the measurement table with +1/-1 inside tolerance", enter a reading you say, clear readings. |
| Photos | Remove a photo, correct its size or its production / sample / gold seal label, or replace it with a photo you attach in the chat with the camera or image button. |
| Report details and AQL | Date, Product Group, Approved Sample, Carton Qty, Shipment Tol. (±%), Selected Carton No, and the AQL values. |
| Results and sign-off | Quality / Measurement / Quantity result (a conditional pass needs a reason), factory tour, and the names. |
| Comments and weight | Add to or replace Section Comments, enter the product weight. |
| Navigation and questions | "Go to Measurements", "What is still missing in this report?" |
- Readings the assistant calculates (fill, +5) carry a small AI tag in the size measurement table. The tag goes away when you type the reading yourself. It is not shown on the Inspection Report.
- A defect added while Measurements is open is listed under Visual Inspections.
- The assistant does not see the photos. It works from their labels (check, size, production / gold seal), so say which photo you mean.
- When something is unclear, the assistant asks instead of guessing — for example when you say a size is wrong but not what it should be.
- The assistant cannot complete the report, clear the draft, or change orders, Site or Inspection Type.
Section 1: Report Details
Check the report details, enter the carton details, confirm AQL sampling, and upload the packing list. Model no, description, customer, vendor and PO number are in the header, so they are not repeated on this page.
Linked orders
Click Edit orders / PO PDF in the header to add or remove orders, choose a different PO PDF, or upload the PO PDF when none was found. The tools open at the top of the page.
Report details
The page has four cards. Values from CRM are plain text. Values you can change are in boxes — click the box and type or pick.
-
In the first card, set Date, Inspection Type and Site. Inspection Type lists the five CRM stages (Pre-Final, Final, Pilot, Inline, Top/Gold). Site lists the sites approved in CRM for that customer and vendor. If you pick a site other than the order's, the app asks for the reason.
-
In the second card, check Colour and Fabric / Composition, and pick Product Group and Approved Sample (required): Red Seal, Green Seal, Gold Seal, Other or Not Available. The box is amber while it is empty or Not Available.
-
In the third card, check the quantities and enter the carton details:
Field What it shows Order Qty Ordered quantity of all linked orders. Initial Shipped Quantity CRM shows as already shipped. Ready Qty Total on the packing list, with its % difference from the ordered quantity. Red when outside Shipment Tol. (±%). Shows — until the packing list is read. Shipment Type HNG, BWH or BFP, from CRM. Carton Qty Number of cartons (required). Hidden for hanging shipments. Shipment Tol. (±%) Allowed difference between ready and ordered quantity. Change it only if the customer allows a different band. Selected Carton No The carton numbers you opened (for example 3, 7, 12-15). Hidden for hanging shipments.With several linked orders, a table under these fields lists PO No, Order Qty, Initial Shipped and Rank for each order.
AQL and Sampling
AQL values are in the fourth card. They are calculated from the shipment quantity and can be changed by the inspector.
- Review AQL Level, # Qly Sample, # Mst Sample and # Carton Select, then the AQL and Acc (accept) values for Critical, Major and Minor.
- Change a value only when needed. A changed value shows a pen icon, and a line under the fields shows the calculated value, Reset to calculated value, and a box for the reason.
- Use Refresh Auto Calculation at the bottom right of the card to restore all calculated values.
Packing list
Capture the packing list as a photo or spreadsheet under the cards. AI reads the packed quantities and compares them with the ordered quantities on the PO PDF (overall and per size, within the Shipment Tol. (±%)). This packing-list total is the Ready Qty on the sheet and the Shipped figure used for the Quantity outcome on Sign Off.
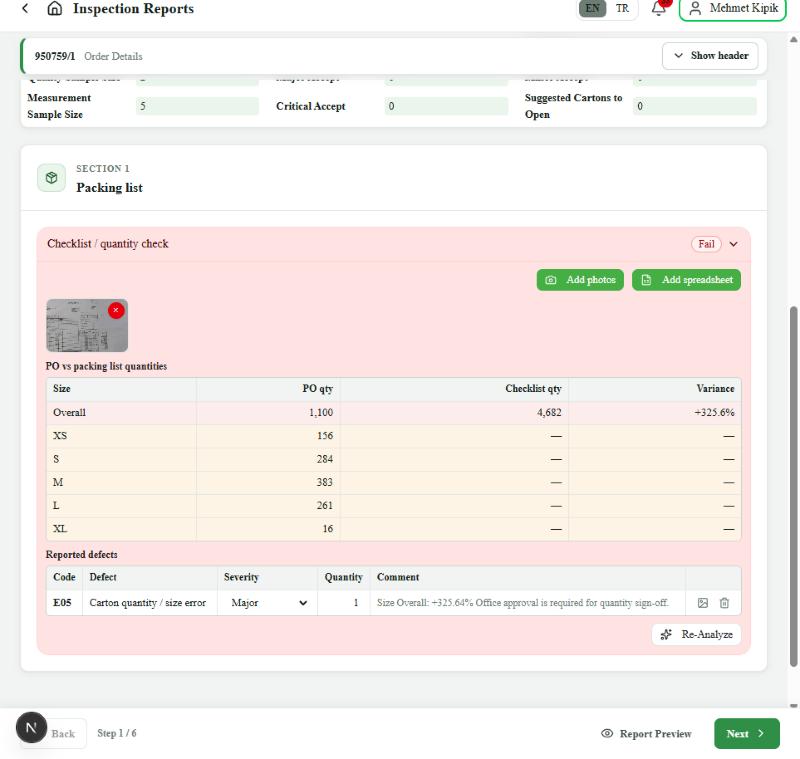
- On Checklist / quantity check, click Add photos to take a picture or pick from the gallery, or Add spreadsheet for a packing-list file.
- Click Analyze with AI (or Re-Analyze after changing the upload).
- Review the card from top to bottom:
- the packing list image,
- PO vs packing list quantities — each size with PO qty, Checklist qty, and Variance; green when inside the tolerance, red when outside,
- Reported defects — an E05 Carton quantity / size error line for each size outside the tolerance. Change Severity or Quantity in the row if needed.
When a size appears on several rows of the packing list (one row per carton, or one per page), the quantities are added together.
When Section 1 is ready, click Next.
Section 2: Packaging and Labeling
Upload packaging and label evidence, run AI on packing checks, and record packaging defects.
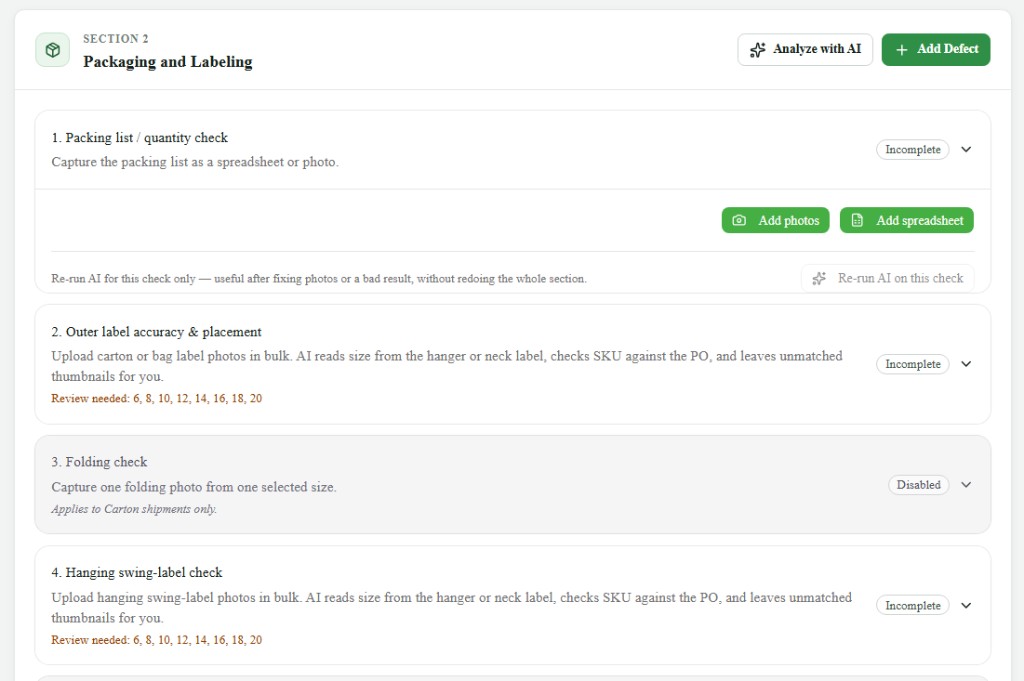
Check card colours and status
Each check card uses colour and a status badge so you can see what still needs work:
| Appearance | Status | Meaning |
|---|---|---|
| White card | Incomplete | Not filled yet — upload photos / files, then run AI. |
| Green card | Complete / Pass | Required evidence is filled and the check passed (or is ready). The card collapses and can be expanded again. |
| Yellow / amber card | Needs review or some items failed | Mixed result — for example some sizes passed and others failed, or some label photos have a SKU mismatch. |
| Red card | Fail | The check failed (for example packing-list quantity out of ±5%, or every compared item failed). |
| Grey card | Disabled | Check does not apply (for example wrong Shipment Type, or manual not configured). Leave it; do not invent a pass. |
| Result badge | Pass, Fail, Needs review, N/A, or Pending | AI or manual outcome after analysis. |
Section actions
At the top of Section 2:
- Analyze with AI — runs AI across the active packaging checks.
- + Add Defect — logs a packaging defect with photos. A note is optional if you want to refine the AI code.
On a single check, use Re-Analyze after fixing photos or a bad result (without redoing the whole section). Re-Analyze stays disabled until required evidence for that check is complete (for example both Production and Gold seal photos on the Wash instruction check for the selected representative size).
1. Carton label accuracy & placement
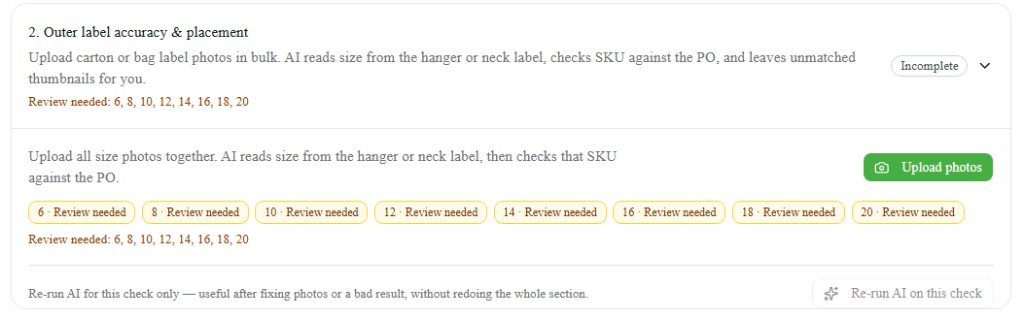
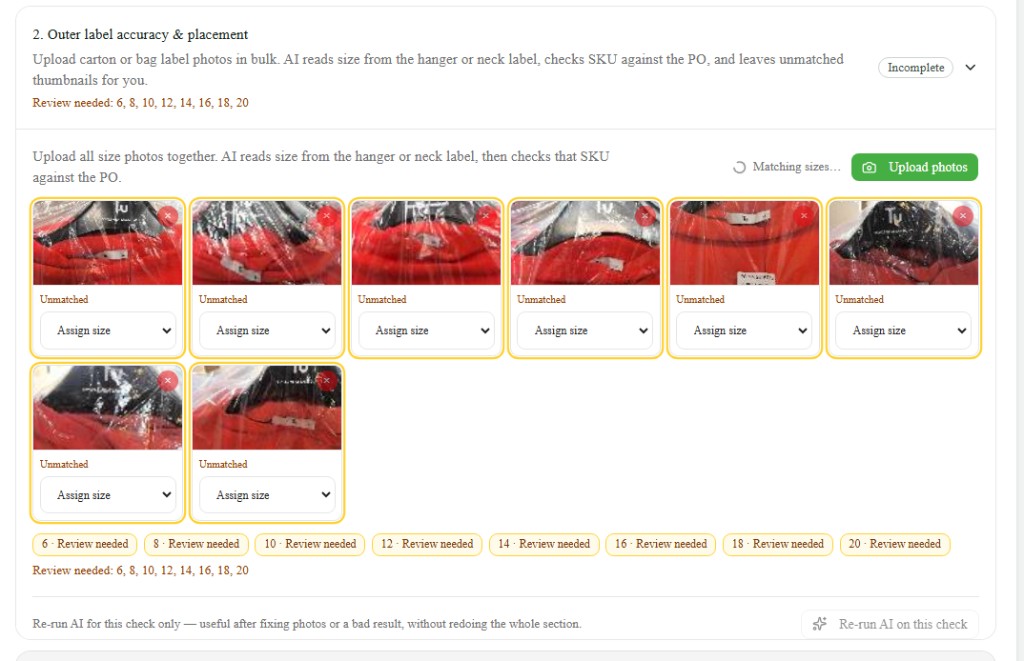
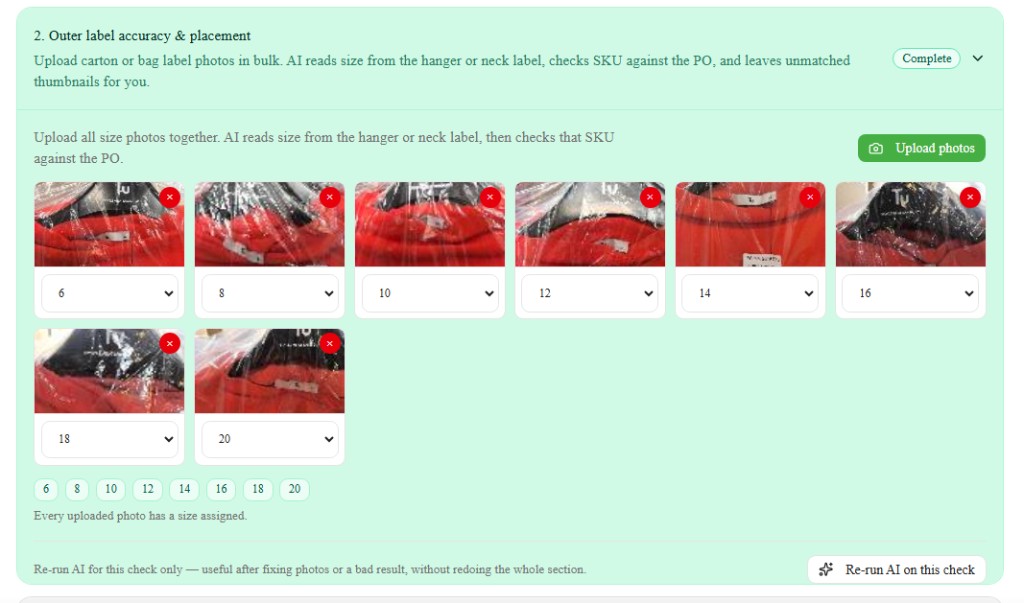
Upload carton or bag label photos in bulk. AI reads the size from the hanger or the neck label, then checks that the SKU on the label matches the PO SKU for that size. Photos it cannot size stay Unmatched. SKU mismatch is marked in red when the printed SKU belongs to a different size. Thumbnails are small; click a photo to view it full size.
If a size has no photo (the carton/label was not available), that size is marked Review needed. You can still continue — analysis will flag those sizes for review instead of blocking the check.
Incomplete: sizes without a photo show Review needed.
Uploaded photos that AI cannot size stay Unmatched. Assign a size on each thumbnail, or Re-Analyze.
Complete: every uploaded photo has a size. Missing sizes show Review needed. You can still Upload photos, change assignments, or Re-Analyze.
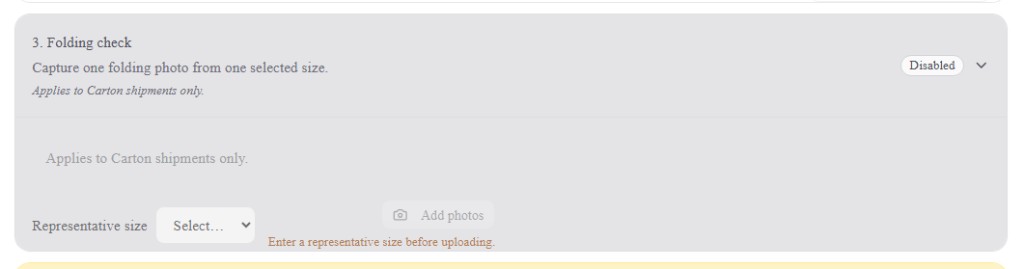
2. Folding check
Confirms the garment is folded the way the customer requires. Capture one folding photo from one size. The card is Disabled until the folding manual is provided. It also stays Disabled for hanging shipments (Applies to Carton shipments only). Leave a disabled card as-is; do not invent a pass.
3. Price tag check
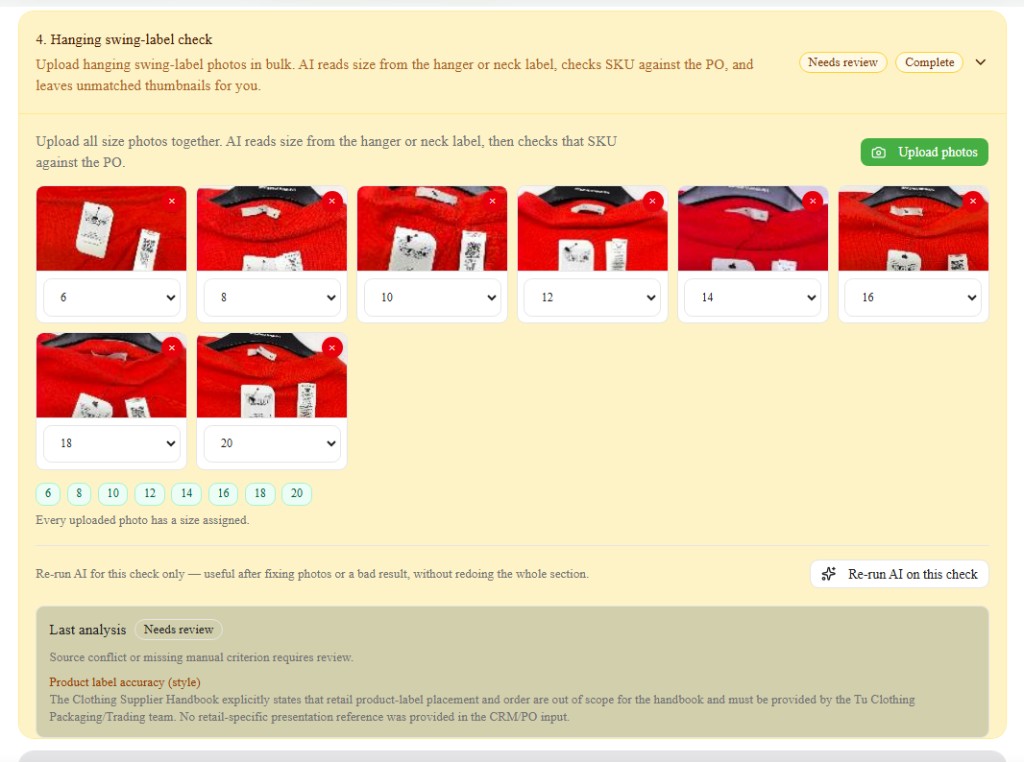
Confirms swing tickets match the PO. Upload photos of swing labels (one per size when you can). AI reads size from the hanger or neck label and checks that SKU against the PO — the same upload pattern as Carton label accuracy & placement. Missing sizes are Review needed; wrong SKU/size pairs are SKU mismatch. Photos AI cannot size stay Unmatched; assign a size on the thumbnail, or Re-Analyze.
4. Product label placement
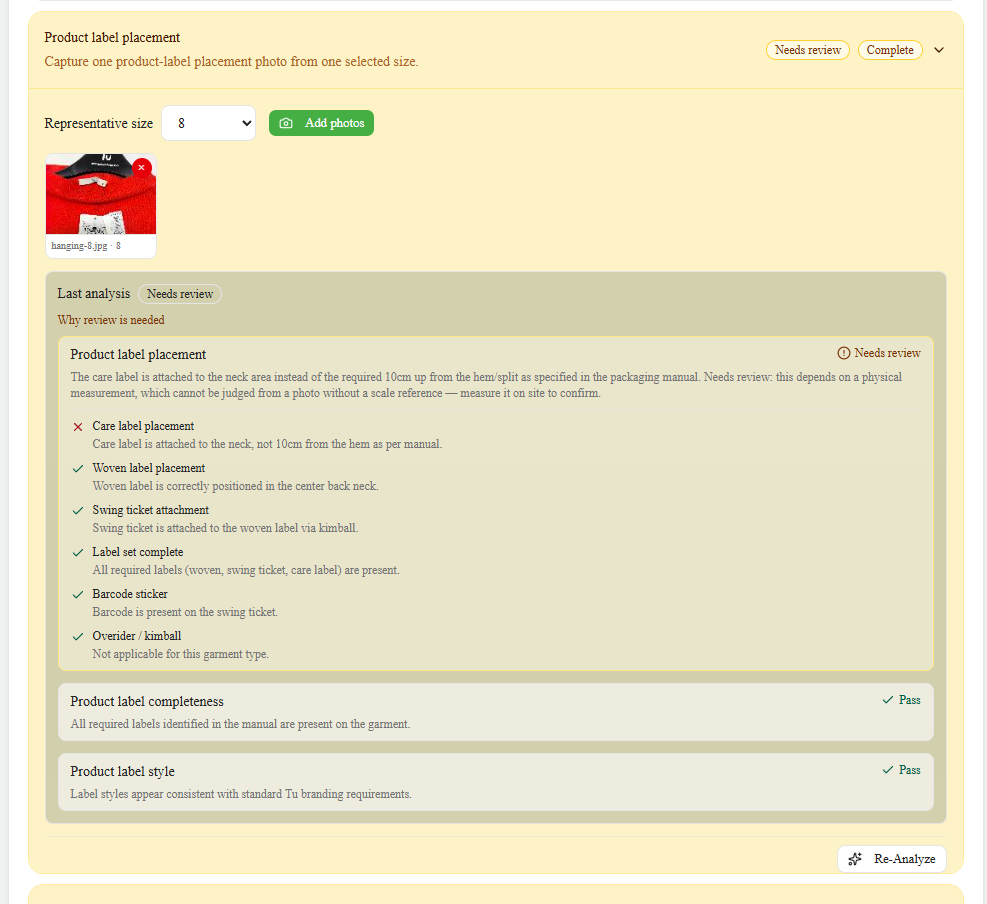
Confirms retail/product labels are in the correct place and complete set for the garment type. Capture one product-label placement photo from one selected size. Open Manuals & PO in the header to compare against the packaging manual page for this product.
- Choose Representative size.
- Click Upload production photo and add one photo showing label placement on the bulk garment (for example neck labels on a hanging garment). Add the approved reference with Upload gold seal.
- Click Analyze with AI (section) or Re-Analyze (on this check) when the card is Complete.
- Under Last analysis, review the outcome badge and detail:
- Why review is needed when the check is Needs review or Fail
- Criteria such as placement, completeness, and style
- Per-label breakdown (wash instruction placement, woven label, swing ticket, barcode, and similar)
Some placement rules depend on physical measurements (for example distance from hem). When AI cannot judge from the photo alone, the result may be Needs review — measure on site and note in Section Comments if needed.
An approved CRM product-label sample is optional; when CRM provides one, AI may also compare barcodes and set order.
5. Wash instruction check
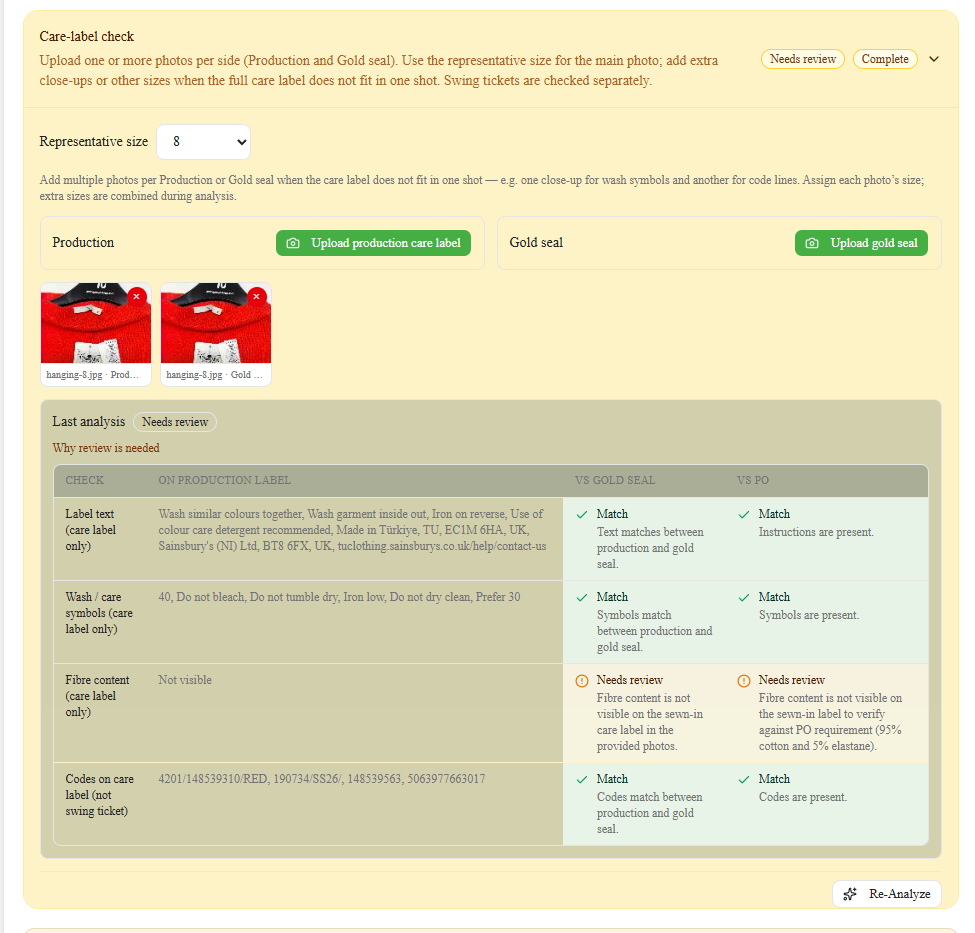
Confirms the sewn-in wash instruction label matches the approved gold seal reference and PO data. Select a Representative size, then upload photos for both sides:
- Upload production wash instruction label — the label on the bulk garment
- Upload gold seal — the approved gold seal / reference label
You can add more than one photo per side (close-ups or other sizes when the full label does not fit in one shot). AI uses the representative size as the main comparison; extra sizes are supporting evidence.
Open Manuals & PO in the header when you need label placement or presentation rules from the packaging manual.
- Choose Representative size.
- Upload Production and Gold seal photos for that size (required before Re-Analyze is enabled).
- Click Analyze with AI or Re-Analyze.
- Under Last analysis, review comparison results (production vs gold seal text and symbols, and PO content when available).
Section Comments
At the bottom of Section 2, use Section Comments to add notes about packaging and labelling (for example packing issues, label exceptions, on-site measurements AI could not verify, or anything AI should not be expected to catch).

- Open Section 2: Packaging and Labeling.
- Complete each active (non-disabled) check card.
- Click Analyze with AI, then review each status badge.
- Optionally + Add Defect, add Section Comments if needed, then Next.
Section 3: Product Validation
Capture production vs approved sample evidence (style and fit comparison).
Check cards use the same colour and status meanings as in Section 2: Packaging and Labeling.
Checks in this section
| Check | What it covers |
|---|---|
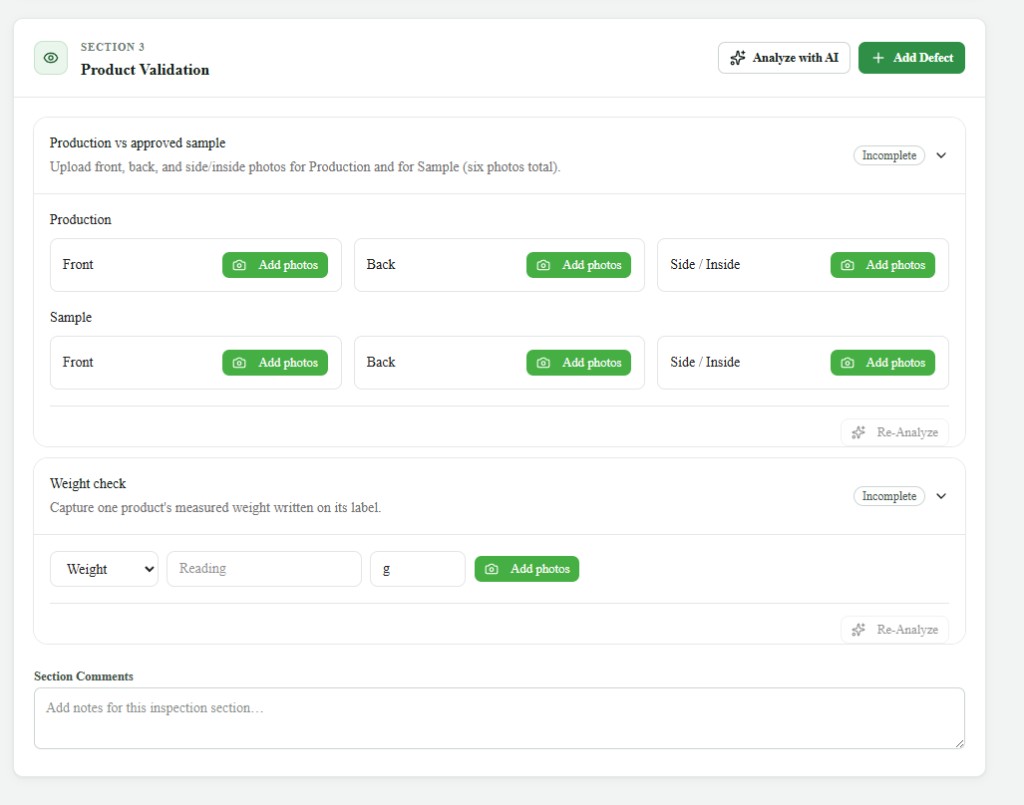
| Production vs approved sample | Style and fit comparison using six photos: Production and Sample, each with Front, Back, and Side / Inside upload slots. CRM approved sample photos are optional; upload your own production and sample photos and run Re-Analyze. |
| Weight check | Weigh one product, write the weight on the label, and capture a photo. Compare against CRM weight when available (−3% to +3% tolerance). |
At the top of Section 3 use Analyze with AI for the section.
Production vs approved sample
When this check is active (not Disabled), upload six photos:
- Under Production, add Front, Back, and Side / Inside photos of the bulk production item.
- Under Sample, add Front, Back, and Side / Inside photos of the approved sample garment.
- Click Re-Analyze after changing photos. Photos are resized automatically before the analysis.
- Read the result on the card. When the check passes, the Front, Back, and Side results are listed. If the analysis cannot finish, a message explains why — the analysis timed out, the photos are too large, or the photos could not be loaded. Retake or re-upload the photos, then click Re-Analyze again.
Weight check
- Weigh one product and write the weight on its label.
- Upload a photo showing the measured weight written on the label.
- Enter the Weight or Grammage value and unit on the check card.
- Click Re-Analyze after changing photos or the entered value. AI compares against the CRM weight reference when available.
Section Comments
At the bottom of Section 3, use Section Comments to add notes for product validation.

When Section 3 is ready, click Next.
Section 4: Visual Inspections
Record workmanship and physical faults. Add defects with AI or manually without a photo.
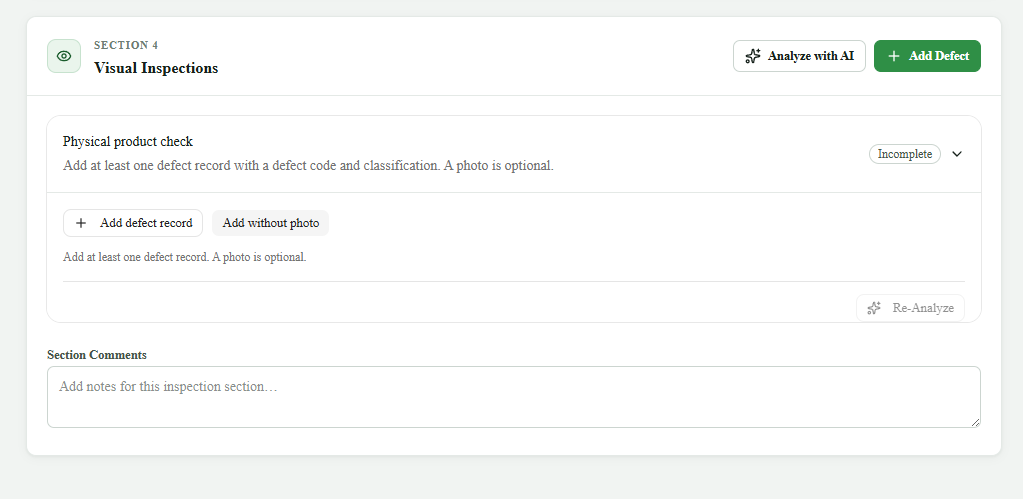
Check cards use the same colour and status meanings as in Section 2: Packaging and Labeling.
Checks in this section
| Check | What it covers |
|---|---|
| Physical product check | Workmanship and physical faults. Add at least one defect record with a defect code and classification. A photo is optional. |
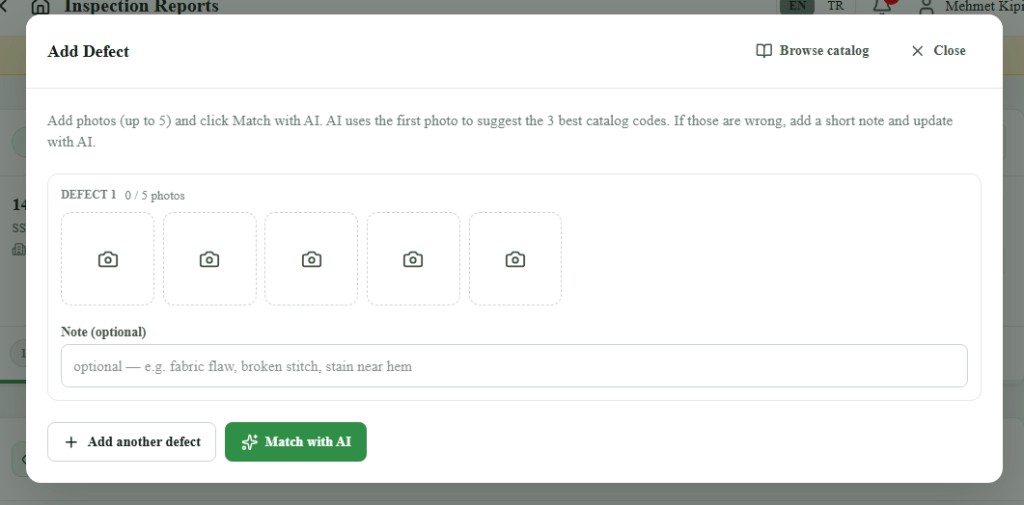
At the top of Section 4 use Analyze with AI for the section, or + Add Defect to open the defect dialog.
Add a defect with AI
- Click + Add Defect (section header) or + Add defect record on Physical product check.
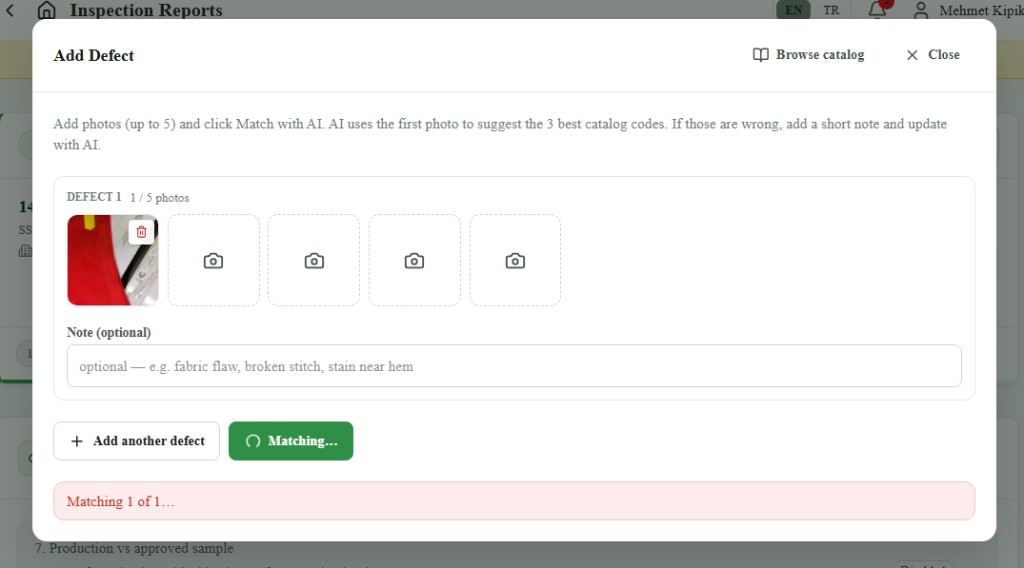
- Add up to 5 photos in the row of slots. Each empty slot opens the phone chooser so you can take a photo or pick from the gallery. AI uses the first photo. A description is not required.
- Optionally + Add another defect in the same dialog, or use Browse catalog to pick a code manually.
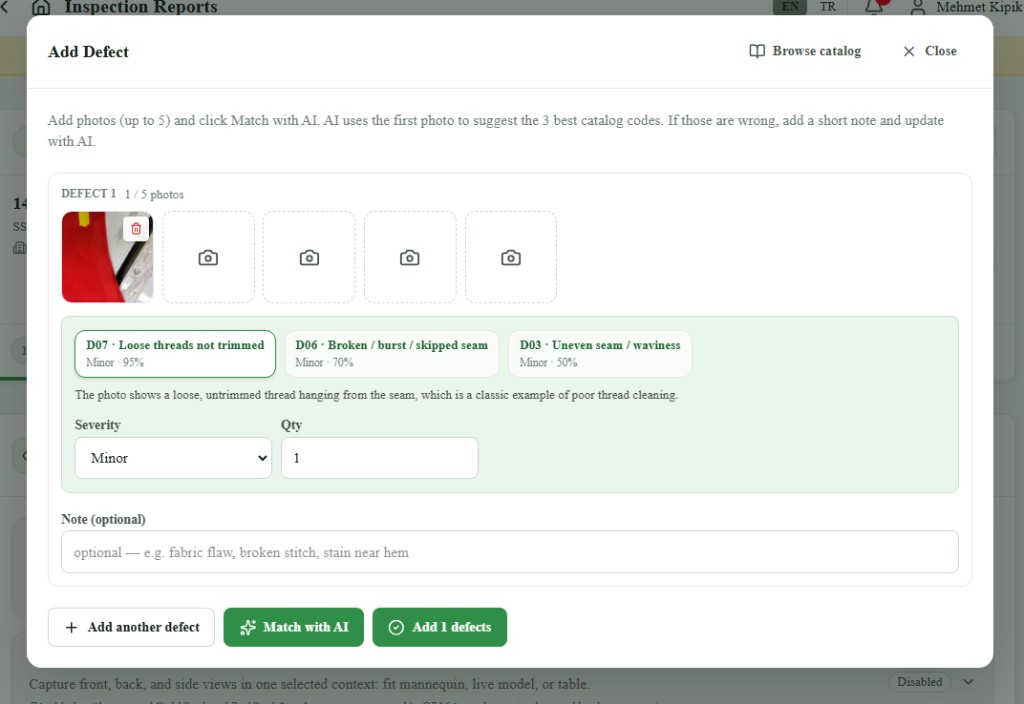
- Click Match with AI. Review the 3 suggested catalogue codes, then pick one. Adjust Severity and Qty if needed.
- If none of the codes fit, type a Note (optional) (for example fabric flaw, broken stitch, stain near hem) and click Update with AI. New codes replace the previous suggestions.
- Click Add N defects to save.
Add a defect manually without a photo
- On Physical product check, click Add without photo.
- Enter Defect code, set Severity and Qty, and optionally a Description.
- Click Save defect (or Cancel).
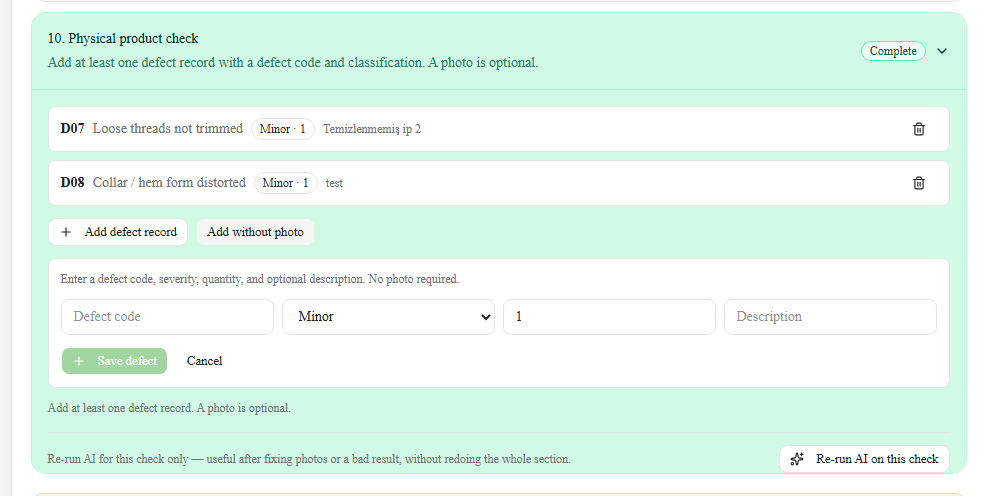
Saved defects appear on the check card (code, severity, qty, note). Remove one with the trash icon if needed.
You can clear a defect Qty and type a new number — in Add without photo, in the Add Defect window, and on saved defect rows. If you leave the field empty, it goes back to 1.
Section Comments
At the bottom of Section 4, use Section Comments to add notes for visual inspections.
When Section 4 is ready, click Next.
Section 5: Measurements
Record size measurements against the graded spec. Enter values in the table, upload a customer measurement workbook, or add photos of the measurement sheet.
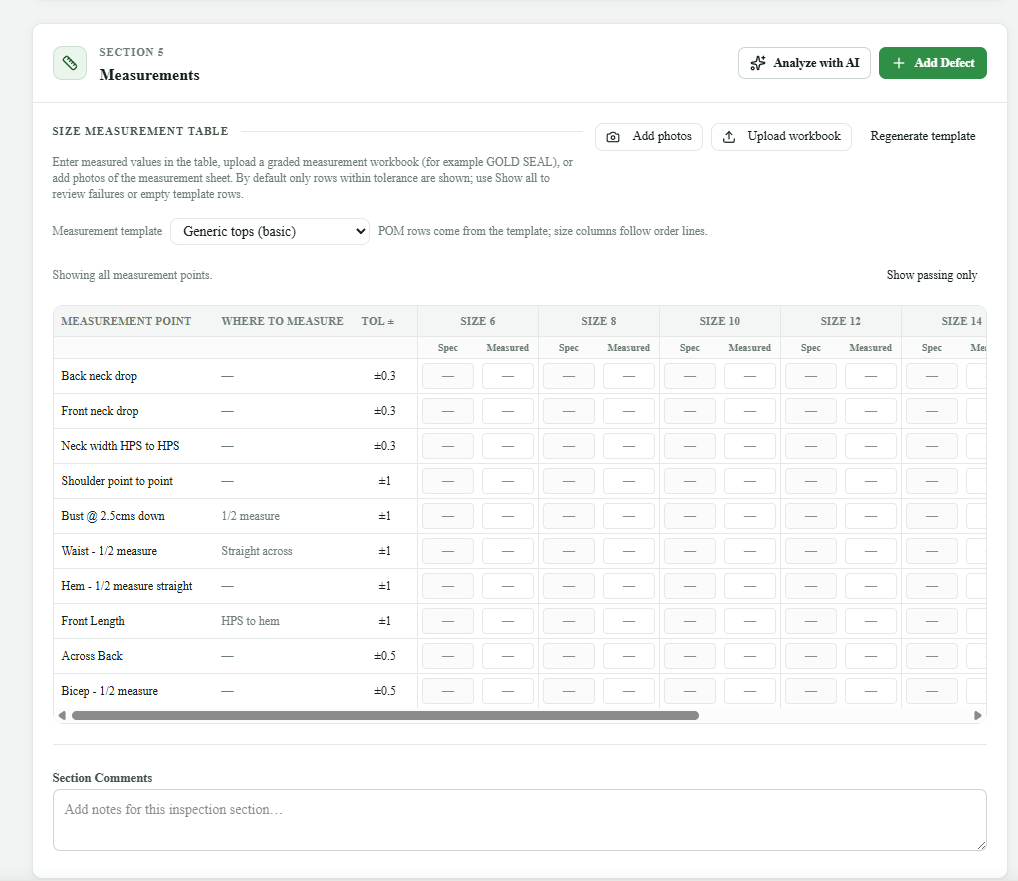
Size measurement table
- Open Section 5: Measurements.
- Choose a Measurement template from the dropdown. The app auto-selects a customer-specific template when the order Customer matches a template alias (for example TU dress (GOLD SEAL) when the customer is TU or TU Clothing Ltd). When no alias matches, it uses the default template (Generic tops (basic)). Size columns are built from order lines — they are not stored in the template.
- Use Regenerate template after order sizes change, or when you want a fresh empty table from the selected template. Regenerating or switching templates clears all spec and measured values.
- Enter Spec (expected) and Measured values per size, or use the toolbar above the table:
- Add photos — attach one or more photos of the measurement sheet (for example a graded GOLD SEAL printout).
- Upload workbook — choose an Excel file (for example a TU dress workbook) to fill the table from a sheet.
- When the workbook has multiple tabs, pick the correct sheet from the Sheet dropdown (for example GOLD SEAL).
- Uploaded photos and spreadsheets appear under Uploaded evidence on the table panel. You can remove an item if you uploaded the wrong file.
- The table is a compact grid. Code and Measurement point stay in place while you scroll across sizes; hover a shortened Where to measure text to read it in full. Use Show passing only to hide rows with no in-tolerance values, and Show all to bring them back. Out-of-tolerance values are red; hover one to see its deviation.
- When any values are outside tolerance, an Out of tolerance summary appears below the table listing the measurement point, size, spec, measured value, deviation, and tolerance.
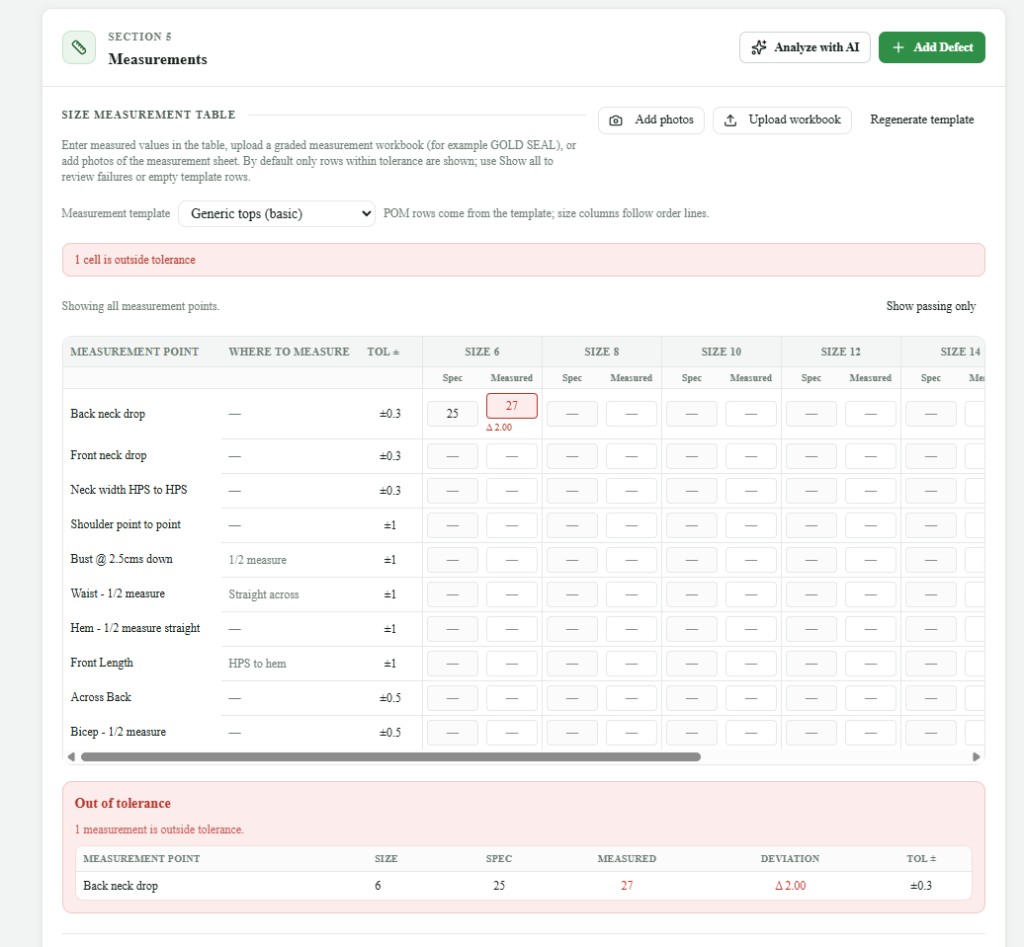
Section 5 is complete when the size measurement table has readings or you have uploaded at least one photo or workbook. Out-of-tolerance values must be resolved or noted in Section Comments before moving on.
Section Comments
At the bottom of Section 5, use Section Comments to add notes about measurements (for example tolerance exceptions or sample size used).
When Section 5 is ready, click Next.
Section 6: Sign Off
Review the overall Quality / Measurement / Quantity overview, then complete the sign-off fields.
Overview
At the top of Section 6, one grid shows the three outcomes — a row each for Quality, Measurement, and Quantity with Figures, Issues, and Result:
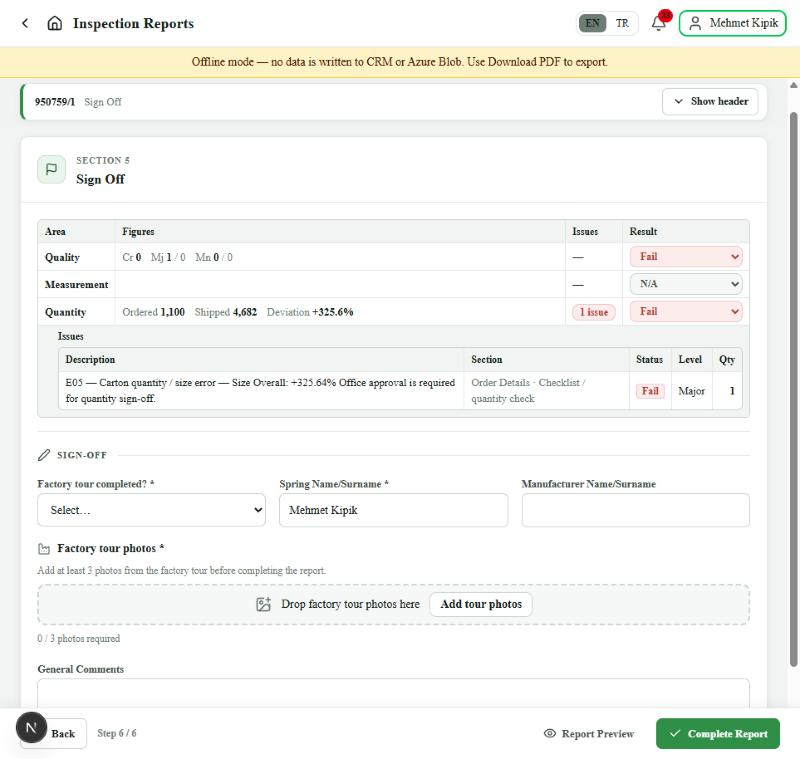
| Row | What it shows |
|---|---|
| Quality | Defect totals (Cr critical, Mj major, Mn minor) and the Quality outcome. Starts as Auto-computed from defects vs AQL accept numbers. You can change it to Pass, Conditional Pass, Fail, or N/A (same choices as Measurement). If you override it, a Manually changed tag appears with the calculated value; use Reset to calculated value to restore auto. |
| Measurement | Starts as Auto-computed from the size measurement table and check 12 (Measurement check): Fail when any value is out of tolerance or check 12 fails; Pass when readings are in tolerance; N/A when no measurement data was captured. You can override to Pass, Conditional Pass, Fail, or N/A. If you override it, a Manually changed tag appears with the calculated value; use Reset to calculated value to restore auto. |
| Quantity | Ordered (PO PDF), Shipped (packing list from 2.1), and Deviation. Starts as Auto-computed after the packing-list check is analysed (within the checklist tolerance band). Pass when shipped qty is inside the band (exact match not required). Fail when outside the band — issue text reminds you that office approval is required for quantity sign-off. After office approval, set Pass manually and record the approval in Conditional Pass justification for Quantity. |
Confirm Quantity and Quality match what you found on the floor when you leave them auto. Change either only when the calculated result is wrong. For Conditional Pass on Quality, Measurement, or Quantity, enter the Conditional Pass justification when prompted (Quantity uses an office-approval placeholder when you override a fail).
When a result is Conditional Pass, the justification box opens directly under its row. The Issues column shows how many issues were logged (for example 1 issue), and the issues table for that area opens under its row. Rows with no logged issues show —.
| Column | What it shows |
|---|---|
| Description | Defect code and name, inspector/AI note, or the check issue (for example SKU mismatch or review needed). |
| Section | Wizard section and check (for example Report Details · Checklist / quantity check). Click a row to open it. |
| Status | Fail or Needs review. |
| Level | Critical, Major, or Minor when a defect quantity was logged; otherwise —. |
| Qty | Count for that level, or how many sizes are affected. |
Category mapping: Quantity — packing-list / quantity check failures. Measurement — size measurement table / Measurement check issues. Quality — all other defects and check failures (packaging labels, product validation, visual inspections, and logged defects).
Sign-off fields
Under Sign-off:
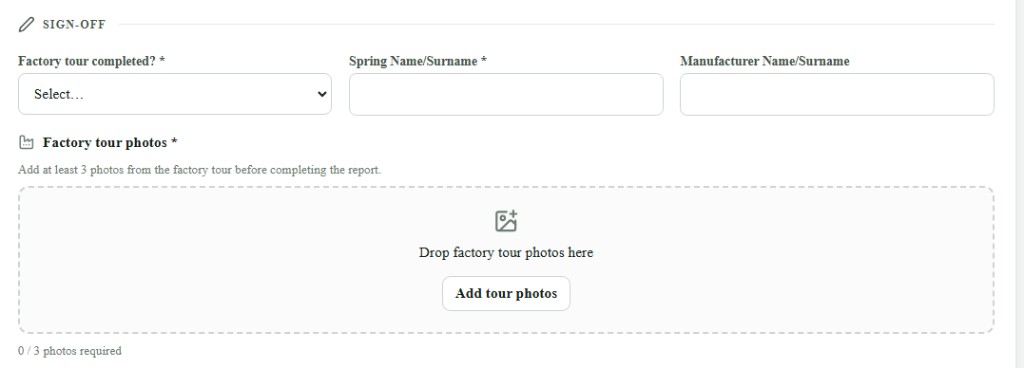
- Set Factory tour completed? to Yes (required). The report cannot be completed if this is left blank or set to No.
- Upload at least 3 photos from the factory tour (required). Drop images on the Drop factory tour photos here line or use Add tour photos.
- Enter Spring Name/Surname (required).
- Enter Manufacturer Name/Surname.
- Add General Comments for the overall inspection if needed.
When Section 6 is ready, click Complete Report (header or footer). You can also open Report Preview from the footer. Fix any highlighted required fields if validation blocks completion — including factory tour and the three tour photos.
Expected result: Report Preview opens with the Inspection Report.
Report Preview
Opens the Inspection Report so you can review the finished document, print it, or save a PDF. You can open Report Preview from the footer at any time, or it opens after Complete Report.
From the preview bar use Print, Save as PDF, Back to Form, or × to close. The layout is compact, with several photos per row.
Order summary
The top of the report shows the Inspection Report header, date, and model / report id, then Order summary (date, control type, customer, manufacturer, model, colour, fabric, order qty, carton qty, opened carton qty, box numbers, AQL levels, sample sizes, acceptance numbers) and the order / shipment qty table.
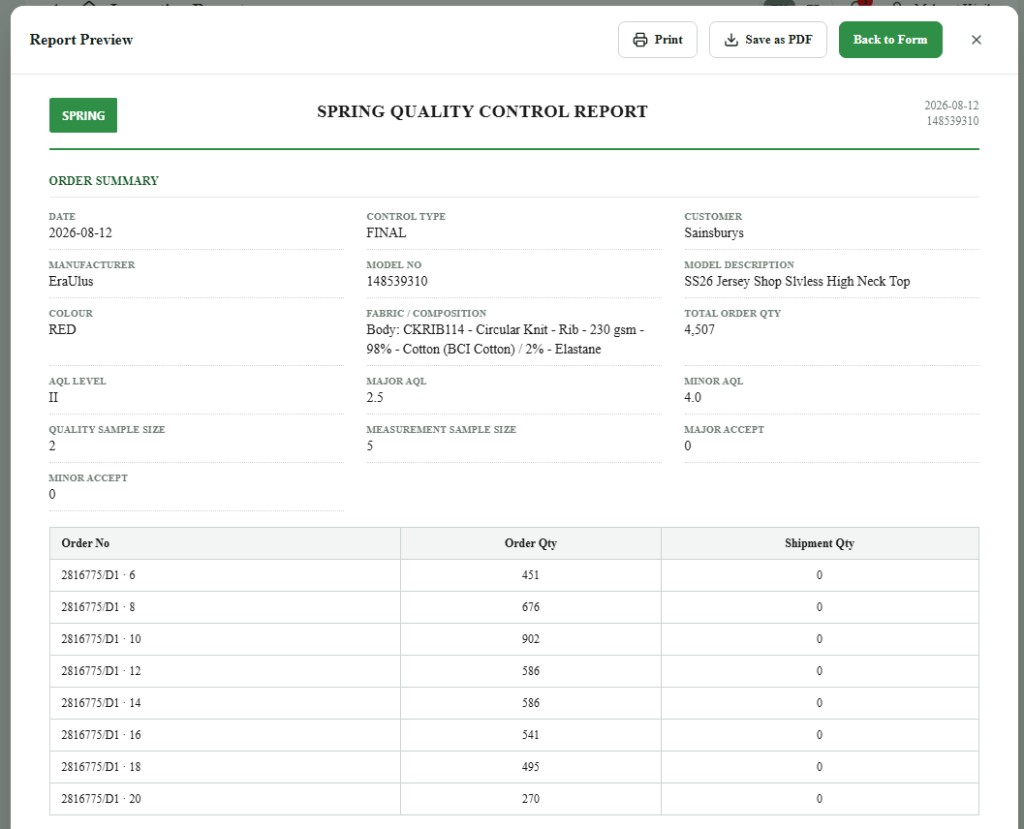
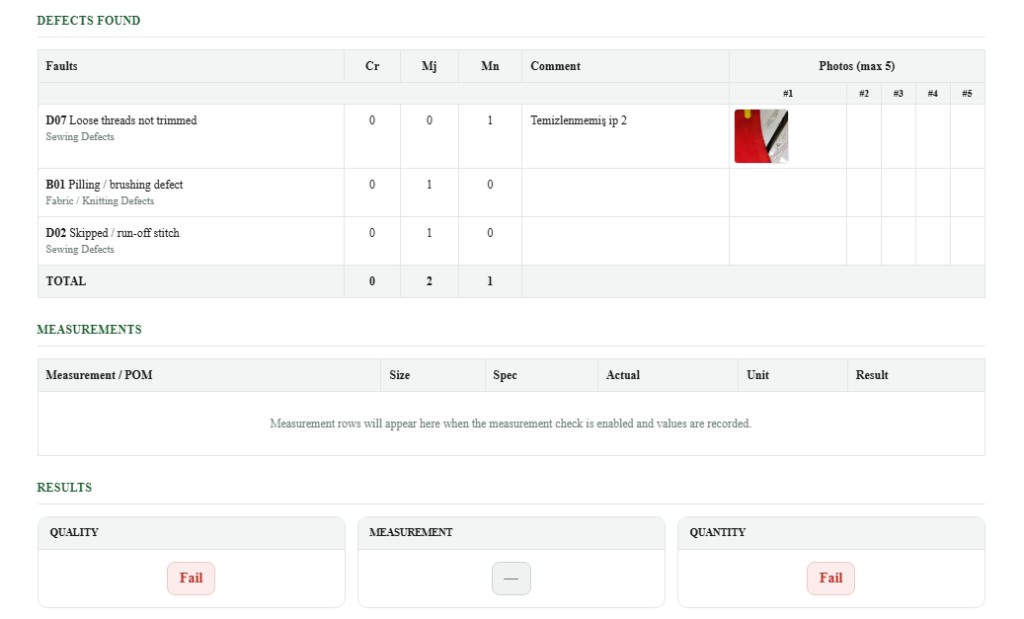
Defects found, Measurements, and Results
| Block | Contents |
|---|---|
| Defects found | Fault codes by category, Cr / Mj / Mn counts, comments, and photos (max 5), plus totals. |
| Measurements | Size-table rows from Section 5: Pass for in-tolerance values and Fail (highlighted) for out-of-tolerance cells. Empty until spec and measured values are entered. |
| Results | Overall Quality, Measurement, and Quantity outcomes from Sign Off (for example Pass, Fail, or —). |
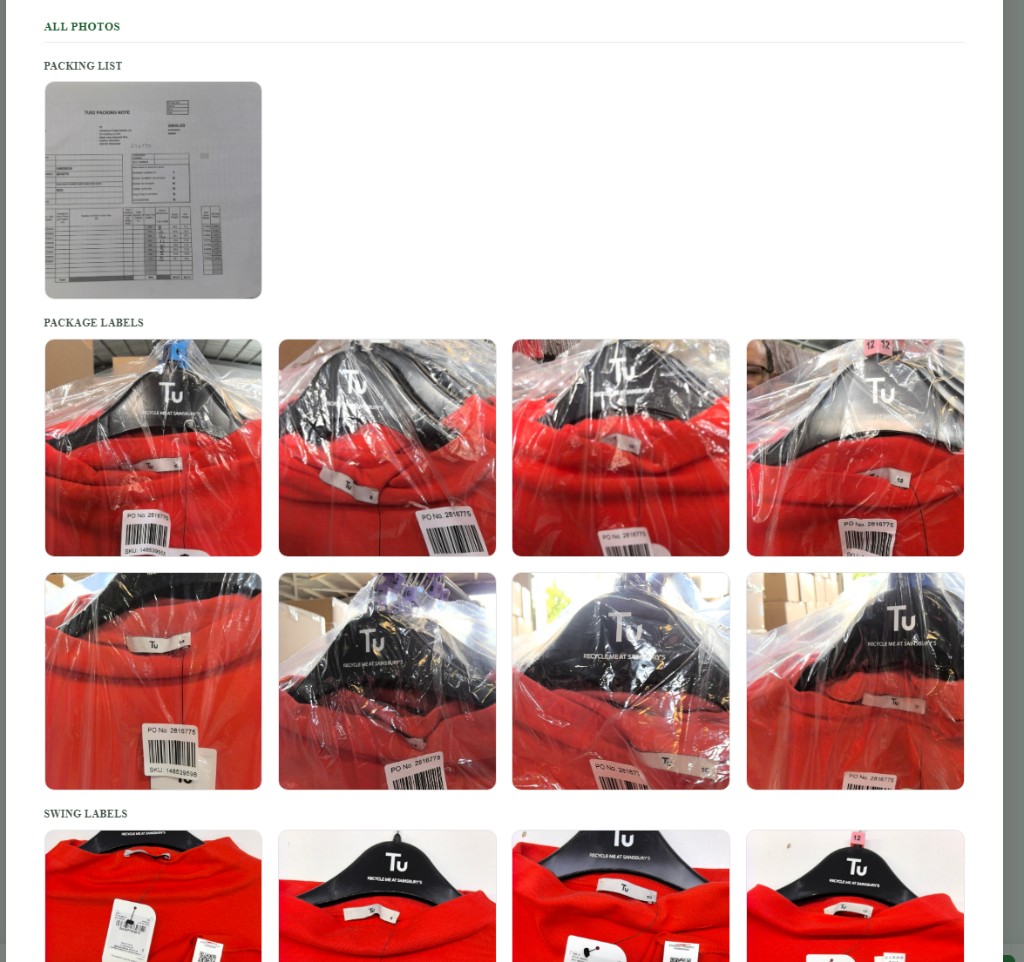
All photos
All photos groups evidence photos by type, with a heading for each group (for example Factory tour, Packing list, Package labels, Swing labels, Wash instruction labels, and Defects). Individual photos are not captioned.
Scroll further to see sign-off lines (Spring Name/Surname, Manufacturer Name/Surname) when they are filled in Section 6.
Actions
- Review the preview content above.
- Click Print or Save as PDF.
- Click Back to Form (or ×) to return to the wizard.
Do not use Clear Draft unless you intend to discard the whole inspection.
Exceptions and Escalation
- No CRM orders / product not found — try customer PO as well as Spring style; confirm the order is active in CRM. Escalate to Merchandising / IT if CRM search keeps failing.
- CRM took too long to answer — search again with a longer style or order number. If Your CRM sign-in has expired appears, sign in again and retry.
- Order not found in search — the order may be closed (for example Shipped, Cancelled, or Paid). Closed orders cannot be inspected. Check the order status in CRM.
- Complete Report blocked for a closed PO — a message names the PO that is closed. Remove that order with Edit orders / PO PDF, or check the order status in CRM with Merchandising.
- PO PDF missing — on Report Details, click Edit orders / PO PDF and upload the purchase order so the packing-list and carton-label checks can compare sizes, SKUs and quantities.
- Sizes missing after a PO PDF was chosen — upload the PO PDF again from Edit orders / PO PDF. Reports started before 29/09/2026 read only Sainsbury's PO layouts.
- AI service failed / Needs review — photos are usually already saved; use Re-Analyze or Analyze with AI again. On Product label placement and Wash instruction check, expand Last analysis to read why review was flagged. Add clearer photos if evidence is insufficient.
- Product Validation analysis failed — the message says whether it timed out, the photos were too large, or the photos could not be loaded. Retake or re-upload the photos and click Re-Analyze.
- Re-Analyze disabled — required evidence for that check is not complete (for example missing Gold seal photo for the selected representative size on the Wash instruction check).
- Packaging manual not found — Manuals & PO in the header shows no matching page; confirm CRM product fields (department, category, style description) on Report Details, then try again. Escalate to QC / IT if the product should map to the Tu manual.
- Folding or other check disabled — follow the on-screen reason (manual not configured or wrong loading type); do not invent a pass.
- Clear Draft by mistake — the inspection cannot be restored; start a new report.
- Lost work after closing the tab — if you dismissed the browser warning and closed the tab, open Inspection Reports again on the same browser and check Saved on this device, or return to the report URL if you still have it. Sign in with the same Microsoft account on the same device.
- No internet at the factory — complete Sections 2–5 offline after the report has started; photos and form fields are stored on the device. The setup page and Analyze with AI need connection when you are ready.
- Report assistant button missing — it shows only on an open report, not on the setup page.
- Report assistant says something went wrong — check your connection and send the message again. If it keeps failing, make the change on the page and report it to IT.
- Microphone is greyed out — this browser does not support voice input. Type the instruction, or use Chrome, Edge or Safari.
- A change card shows a red line (for example That defect is no longer in the report) — the report changed after you asked. Ask again.
Related articles
- Inline Inspection — Order Management process
- Final Inspection — Order Management process
- Spring Hub